The Synth project was first started all the way back in January 2021, a whole 2 years ago.
In this time we have worked tirelessly to deliver a consistent, fast, and easy to use tool for generating fake data for databases.
When my colleague Christos wrote about using Rust for our startup, he made no mention of the
fact that we actually use a nightly Rust compiler, and our code incorporates a set of nightly features. So I thought it might be beneficial to look at the cost-benefit ratio of using Rust nightly, for us, for the open source ecosystem, and for Rust.
Disclaimer: I wasn't the one who introduced nightly Rust features into this particular codebase, but I have a good few years of experience with nightly Rust, working on clippy since 2015
Everybody loves features! Features are great! Can't have too many of them. And even if you don't use any nightly features, using a nightly Rust compiler will give you 12 weeks of head start on performance benefits before they hit stable Rust. In fact, for a good four years, I only had a nightly compiler installed, because my Chromebook had very little disk space and I needed nightly for clippy anyway. Besides, who's going to find bugs that nightly may have if no one tests it? Apart from officially unstable features (like, say, internal compiler APIs that clippy used), I only ever once encountered any incompatibility – which I will report later.
That said, once you have nightly, those features are a real temptation. Curiosity had me playing with new toys on more than one crate: bytecount, initially flamer and overflower, and mutagen is still nightly only. Apart from the latter, most only played with one feature at a time. Even with unstable features, many of them were pretty solid already and changes were often easy enough to follow. And if you only write a prototype of something (well, you probably shouldn't be using Rust, but if like me you are very well versed with it, and feel sufficiently productive), an unstable feature or two may give you the extra oomph to get it done, quickly.
Many of the features unlock certain powers that our code can use (e.g. async_closure), or give us a better programming experience (e.g. box_patterns). Those latter features are often undervalued; if for example you have a chain of objects on the heap, matching through all of them in one pattern makes the code much easier to read and maintain (as long as that feature is available, of course). Having to write two, three, four match statements for this becomes cumbersome quickly.
But there's a psychological factor at play: Once you give in to temptation with one feature, your hesitation to adopting yet another one has already diminished. Adding a third one looks even more benign and the fourth one is a no-brainer, right? And so at synth, our core/src/lib.rs starts with this:
There even used to be a try_trait until I removed it because it was easier to replace with a custom implementation than changing the whole code over to try_trait_v2 when the trait design was improved. The synth/src/lib.rs uses another concat_idents feature in some macros, so that's not even all of it. git blame tells us that the first four features were introduced in January '21, with the latter two were added in July. Coming back to that try_trait change, when #88223 hit, I found our code no longer compiled with the latest nightly. Of course we had pinned an older nightly, but I regularly checked if there was trouble on the horizon.
Now this trait was mostly used to use try-like semantics for generators (the part of synth that builds the test data) which could either return a result or yield yet another part of the thing to generate. While this design is very elegant, it is not really dependent on the try trait implementation at all, it only reused a few types from it (and even rarely used question marks). So when this code stopped working, I tried to update it to the new implementation, and when that proved too hairy, I simply removed the feature along with the one or two question marks, added our own GeneratorResult trait and changed a few occurrences of Try trait usage to use our own trait so the code worked again.
I think this case shows us two things:
Sometimes the cost-benefit ratio of a feature can change over time, and often the costs are paid later rather than sooner. In this case, it was the cost of replacing the feature with our own implementation which we could have made right away without using the feature. On the other hand, the feature had worked well for us for a good while, so that was basically repaying technical debt.
Often, it's not too hard to replace a feature. Still it's a chore that takes up time and resources, so unless there's an acute need to do so, the opportunity cost means other things will often be more valuable right now. So features, once used, tend to linger.
Regarding the pinned nightly and also the only incompatibility I ever encountered, I removed that pin when the May 2021 nightly version we had used stopped working with an updated proc_macro2 crate. It was later re-established with a newer version. We have this version in all our CI jobs and also in our rust-toolchain file. There also were a few troubles when we had CI and the main toolchain inadvertently go out of sync, but those were fixed up quickly.
For a version that hails as "unstable", Rust nightly is actually surprisingly solid. That has two reasons: 1. Every PR that gets merged has been extensively tested by CI, so obvious errors get caught out before the code even hits nightly. 2. Whenever a change looks risky, the infrastructure team supplies a "crater run". Crater is a tool that will try to compile every crate on crates.io with a given version of a compiler and compares if things fail to compile now. Since crates.io has 68798 crates in stock at the time of this writing, there's a pretty good chance that whatever weird thing you might encounter in live code is thrown at the compiler. I have done such a rustc change once, and it was very reassuring to know that my PR didn't break any code out there.
If you want to compile your code with the current fastest version, you can use nightly now. As long as you don't use any features, your code should still compile on stable (however, I would still use a stable compiler in CI to check, because some changes may become insta-stable, e.g. added trait implementations; Rust cannot put those behind a feature gate). There is a very small risk of breakage, but you can revert to a beta or stable compiler with no hassle if that happens.
Using nightly features is in a way like every other form of technical debt. A bit of risk taking that can give you some potentially big payoff now, at the price of possible future breakage. Whether you want to take that risk depends a lot on your project and the phase it lives in. If you're a startup desperate to get your project out there, not using that feature may mean that there won't be a project to fix later otherwise. On the other hand, if you are writing code that should live for a while, or a library that is aimed to be widely used, avoiding nightly features is likely your best bet.
If you are on nightly, you have two options: Go all in and embrace the instability or pin a known good version. I now think that pinning is the only sane option for all but hobby projects (where a bit of breakage can be acceptable every now and then). I note that clippy has a special place here, because it's essentially tied to the current rust version by design, and we get away with syncing every two weeks and staying on master (not even nightly) otherwise. Once you decide on a pinned version, you may as well pin all your dependencies and update them very cautiously, because any update could break your build. Even then it may be a good idea to test with a current nightly every now and then to gauge whether any incompatibility will hit you whenever you should decide to update.
If you encounter breakage, take a step back and look if the feature is still pulling its weight or if it's cheaper to get rid of it. So to sum up: Going nightly carries some risk. Being aware of and mitigating that risk can give you benefits now, at the cost of a price tag in the future. As always, your mileage may vary.
When building a company you are setting out to fundamentally solve a problem.
For this reason, engineers have been systematically attracted by this romantic
idea of changing the world with your brain and a laptop. We are at heart problem
solvers.
As engineers, we can (and most of us have) become zealous at times about our
solutions to these problems. We have pragmatists who just get stuff done - they
address the symptom fast and effectively. We have idealists who will grind at an
elegant scalable solution and try to treat the disease. Whichever camp you
subscribe to, at a certain point you need to form an opinion about which
technologies you are going to use to solve the problems you see in the world -
and this opinion will inevitably cause contention.
Conventional wisdom is to 'use the right tool for the job'. The choice of
programming language for example, depends on the domain of the problem you are
trying to solve. If you're implementing some algorithm, in a secluded project,
it's easy to make the case about what the language for the job may be. You can
run a benchmark and literally test the execution time for each candidate
language (if you're optimising for execution time). You can persuade yourself
you've made a rational and 'objectively correct' decision.
However, in the context of building a business, your optimisation function is a
high-dimensional mess involving performance, development velocity, hiring,
server costs, ecosystem, tooling, support, licenses etc. You can assign weights
to what is most important for your business, but at the end of the day the
decision is inevitably qualitative.
At Synth, we're working on building the best data generator in the world. We
made a conscious decision to use Rust for our main line of products. After more
than a year of building I've had the opportunity to see Rust at its best and
worst in the context of starting a company - this post is a compilation of
these (at times cynical) thoughts.
Rust has a really steep learning curve. Coming from an OO background it took
me months to become productive in Rust. This was incredibly frustrating for me
as I felt that my lack of productivity was impacting the team, which it was.
Even when you eventually do become productive (and you will), Rust forces you to
really think deeply about what you're doing and things inevitably take longer to
get over the line. A poorly thought out design decision today can come back to
haunt you months later. What should be a simple change or refactor can end up
resulting in complete tear down as you try to appease the borrow checker. This
is deadly.
The entire premise of a startup is that you have to iterate rapidly. Very few
companies know what they should be building from day one. It's an iterative
process involving a feedback loop of talking to users and making changes to
reflect the feedback. The faster you can make that feedback loop, the higher
probability you have of success.
The evident hit in development velocity is redeemed to an extent by Rust's
emphasis on writing correct programs. "if it compiles it works' so to speak.
I've found this to be true for the most part while building with Rust and it is
an absolute joy to work with for this reason.
Even if your program is not perfect, you understand the failure modes much
better. The set of unknown failure modes is reduced substantially as your
program breaks in exactly the way you expect it to. The lack of null pointers in
conjunction with the Result paradigm (vs say, exceptions) compels you to build
correct programs where edge cases are well understood and are handled explicitly
by you (or unimplemented! but no one is perfect).
If you've reached product market fit - correctness may counteract the
development velocity hit. When you know what you're building you need to iterate
less. Your dev team is also going to be spending less time dealing with bugs as
you've already dealt with that while trying to appease the compiler.
If it compiles it works - and this is an invaluable asset when you're
aggressively shipping code.
Getting great talent is unbelievably important for an early stage startup. The
fact that the absolute number of competent and experienced Rust developers is so
small initially seems detrimental to getting great people. This is exacerbated
by Rust's steep learning curve as you need to hire someone with experience, or
it's going to take months for them to become productive. However, this is not
the full picture.
In our experience the competence of your average Rust developer is much higher
than more conventional programming languages. Something spoke to these
individuals when they picked up Rust, and it's hard to put your finger on it but
it's that same quality that makes a great engineer. It's also been a pleasant
surprise to find out that really good engineers will seek you out as an
employer because you use Rust. They don't want to work in *script or Java or
C++. They want to work with Rust because it's great.
At Synth, we've chosen to adopt an open-core business model. The idea behind an
open-core business is you develop and open source product with a permissive
license which solves a real technical problem. You work on building a user
base, a community and a great product all out in the open. You then structure
your business model around solving the corresponding organisational problem -
and that's how you make money.
We've been really lucky to have a really active set of contributors - giving
ideas, reporting bugs and contributing (at times very significant) code. It is
hard to know for sure, but we have a strong hunch that a lot of the contributors
are active because they have an interest in Rust projects specifically. A lot of
our contributors are also interested in learning Rust - not necessarily being
veterans of the language. This has worked out great as the more experienced
members of our core team mentor and review code of young rustaceans, building a
symbiotic positive feedback loop.
Thank you to all our contributors - you know who you are and you guys are
amazing.
Rust has an ecosystem of incredibly high quality libraries. The Rust core team
has led by example and focused on a high quality and tight standard
library. The result of a highly focused standard library is (unfortunately) a
lack of canonical libraries for doing things outside the standard library. So
you want a webserver, pick from one of the 100s available. You want a crate (
Rust lingo for library) for working with JWT tokens? Here's 9, pick one. I mean,
even something as fundamental as an asynchronous runtime is split
between tokio and async-std and others. As a young rustacean this can
be overwhelming.
What ends up happening over time is certain libraries become implicitly
canonical as they receive overwhelming support and start becoming serious
dependencies differentiating from their alternatives. Also in a project
update from RustConf 2021 it was mentioned that the idea of having 'recommended crates' may be visited in the
future.
The lack of canonical non-standard libraries is an issue when you're getting
started - but over time this diminishes as you get a better understanding of the
ecosystem. What has been constantly detrimental to our development velocity
has been the lack of client libraries for Rust. We've had to write a
bunch of different integrations ourselves, but they're often clunky as we
don't have the time to invest in making them really high quality. For
example most of Google's products have at best an unofficial code-generated
crate maintained by the community, and at worst absolutely nothing. You
need to write it from scratch.
Well it depends. Assuming you're building a product in the right domain for
Rust (say a CLI as opposed to a social media site), even then the answer is not
clear-cut. If you don't have close to 100% conviction that you know what you're
building, I would be inclined to say no. Development velocity and being able to
make rapid iterations is so important for an early stage startup that it
outweighs a lot of the benefits that Rust brings to the table.
If your company is later stage, and you now understand exactly what you should
be building (assuming this is every the case) then I would say yes. The
'correctness' of Rust programs and the propensity of Rust to attract great
engineers can help in building a great engineering culture and a great company.
I personally think that the software we build should make more people's lives better than it makes worse. So when users recently started filing bug reports, I read them with mixed feelings. On one hand, it meant that those particular users were actually using synth, on the other hand, it also meant that we were failing to give them a polished experience. So when it was my turn to write more stuff about what we do here, I set myself a challenge: Find as many ways as I can to break our product.
I briefly considered fuzzing, but decided against it. It felt like cheating. Where's the challenge in that? Also, I wanted to be sure that the bugs would be reachable by ordinary (or perhaps at least exceptional) users, and would accept misleading error messages (that a fuzzer couldn't well decide) as bugs. Finally I am convinced I learn more about some code when actively trying to break it, and that's always a plus. So "let's get cracking!" I quoth and off I went.
Before we start, I should perhaps consider giving a short architectural overview on synth. Basically the software has four parts:
The DSL (which is implemented by a set of types in core/src/schema that get deserialized from JSON),
a compiler that creates a graph (which form a directed acyclic graph of items that can generate values),
export (writing to the data sink) and
import facilities (for creating a synth namespace from a database schema)
My plan was to look at each of the components and see if I can find inputs to break them in interesting ways. For example, leaving out certain elements or putting incorrect JSON data (that would not trip up the deserialization part, but lead to incorrect compilation later on) might be a fruitful target. Starting from an empty schema:
I then called out synth generate until finding a problem. First, I attempted to insert confusing command line arguments, but the clap-based parser handled all of them gracefully. Kudos!
#1 The first thing I tried is using a negative length:
Which was met with BadRequest: could not convert from value 'i64(-1)': Type { expected: "U32", got: "i64(-1)" }. Not exactly a crash, but the error message could be friendlier and have more context. I should note that this is a very unspecialized error variant within the generator framework. It would make sense to validate this before compiling the generator and emit a more user-friendly error.
Bonus: If we make the length "optional": true (which could happen because of a copy & paste error), depending on the seed, we will get another BadRequest error. The evil thing is that this will only happen with about half of the seeds, so you may or may not be lucky here (or may even become unlucky if another version would slightly change the seed handling).
#2 Changing the length field to {} makes for another befuddling error:
Error: Unable to open the namespaceCaused by: 0: at file 2_unitlength/unitlength.json 1: Failed to parse collection 2: missing field `type` at line 8 column 1
The line number is wrong here, the length should be in line six in the content object, not in line eight.
#3 It's not that long that we can use literal numbers for number constants here (for example given the length). The old way would use a number generator. A recent improvement let us generate arbitrary numbers, however this is likely not a good idea for a length field:
This might be done very quickly, but far more likely it will work for a long time, exhausing memory in the process, because this actually generates a whole lot of empty objects (which are internally BTreeMaps, so an empty one comes at 24 bytes) – up to 4.294.967.295 of them, which would fill 96GB! While this is not an error per se, we should probably at least warn on this mistake. We could also think about streaming the result instead of storing it all in memory before writing it out, at least unless there are references that need to be stored, and this would also allow us to issue output more quickly.
Oops, I forgot to specify which kind of string. But I wouldn't know that from the error:```consoleError: Unable to open the namespaceCaused by: 0: at file 4_unknownstring/unknownstring.json 1: Failed to parse collection 2: invalid value: map, expected map with a single key at line 10 column 1
#5 Ok, let's make that a format then. However, I forgot that the formatmust contains a map with the keys "format" and "arguments", putting them into the s map directly:
``json synth[expect = "argumentsis expected to be a field offormat`"]
{
"type": "array",
"length": {
"type": "number",
"subtype": "u32"
},
"content": {
"type": "object",
"s": {
"type": "string",
"format": "say my {name}",
"arguments": {
"name": "name"
}
}
}
}
```consoleError: Unable to open the namespaceCaused by: 0: at file 5_misformat/misformat.json 1: Failed to parse collection 2: invalid value: map, expected map with a single key at line 14 column 1
#6 Ok, then let's try to use a faker. Unfortunately, I haven't really read the docs, so I'll just try the first thing that comes to mind:
This gets us:```consoleError: Unable to open the namespaceCaused by: 0: at file empty/empty.json 1: Failed to parse collection 2: invalid type: string "name", expected struct FakerContent at line 11 column 1
One could say that the error is not exactly misleading, but not exactly helpful either. As I've tried a number of things already, I'll take it. Once I get the syntax right ("faker": { "generator": "name" }, the rest of the faker stuff seems to be rock solid.
#7 Trying to mess up with date_time, I mistakenly specify a date format for a naive_time value.
This gets me the following error which is again misplaced at the end of the input, and not exactly understandable. The same happens if I select a date format of `"%H"` and bounds of `0` to `23`.```consoleError: Unable to open the namespaceCaused by: 0: at file 7_datetime/datetime.json 1: Failed to parse collection 2: input is not enough for unique date and time at line 16 column 1
I believe since the time is not constrained in any way by the input, we should just issue a warning and generate an unconstrained time instead, so the user will at least get some data. Interestingly, seconds seem to be optional, so %H:%M works.
#8 More, if I use naive_date instead, but make the minimum 0-0-0, we get the technically correct but still mis-spanned:
Error: Unable to open the namespaceCaused by: 0: at file 8_endofdays/endofdays.json 1: Failed to parse collection 2: input is out of range at line 16 column 1s
For the record, the error is on line 11.
#9 Now we let date_time have some rest and go on to categorical. Having just one variant with a weight of 0 will actually trigger an unreachable error:
Well, the code thinks we should not be able to reach it. Surprise!
thread 'main' panicked at 'internal error: entered unreachable code', /home/andre/projects/synth/core/src/schema/content/categorical.rs:82:9note: run with `RUST_BACKTRACE=1` environment variable to display a backtrace
For the record, this is the first internal error I was able to uncover so far. Given this success with categorical strings, it was natural to look if one_of could be similarly broken, but the generator just chose the one variant despite its 0.0 weight.
#10 Unsupported types on import
Databases can sometimes contain strange things, and so far the support is in beta, so it was expected that I would find types for which we currently don't implement import. This includes JSON for mysql and postgres, the mysql spatial datatypes as well as postgres' geometric types, user-defined enumerations, postgres' network address types, postgres arrays (soon only nested ones), etc.
The way to reproduce that is to create a table with a field of the type, e.g. here with mysql
will give us a wrong data type error from postgres. The problem here is that we lose the type information from the generator, and just emit null values which do not allow us to construct the right types for encoding into a postgres buffer. The solution would be to re-architect the whole system to reinstate that type information, possibly side-stepping sqlx in the process. Note that this is not equal to issue #171, which relates to nested arrays.
#12 going back to #3, I thought about other ways to make the code overconsume resources. But time and memory are only one thing to consume, in fact it's easy enough to consume another: The stack. The following bash script:
Error: Unable to open the namespaceCaused by: 0: at file 12_stack_depth/stack_depth.json 1: Failed to parse collection 2: recursion limit exceeded at line 1 column 2929
So I give up. I've found 1 way to crash our product with an unintended error, reproduced some known limitations and outlined a number of error messages we can improve on. I fell far short of my original goal, which either means I'm really bad at finding errors, or our code is incredibly reliable. Given the track record of software written in Rust, I'd like to think it's the latter, but I'll leave judgement to you.
Anyway, this was a fun exercise and I looked at many more things that turned out to just work well, so that's a good thing™. With all the test automation we have today, it's easy to forget that the manual approach also has its upsides. So feel free and try to break your (or our) code!
API mocking refers to the process of simulating the behaviour of a real API
using a fake replacement.
There are many great use-cases for API mocking. You may want to mock an API to
eliminate development dependencies between engineering teams. If for example a
service which is a dependency to your front-end isn't ready - you may want a
placeholder which will unblock your front-end team.
API mocking is also a really powerful tool when doing integration tests against
3rd party APIs. This can be broken down roughly into functional and non-function
testing:
Functional Testing: You care about the semantics of the API. It is important
to be able to make a request and get an appropriate response which takes your
request into account. Unfortunately API providers often have sub-par testing
environments which can make this a real pain.
Non-Functional Testing: You don't really care about the semantics of the API.
This can be used to speed up integration tests as requests don't need to
travel to the API providers servers. You may also want to verify your SLAs,
load test / stress test your systems etc. In this case being rate-limited by
the API provider's testmode can be a limiting constraint.
At Synth, we're building a declarative data generator.
We wanted to apply our data generation engine to mocking a subset of a popular
API and see how far we could go. We set out to prototype a solution over (roughly)
5 days as a side project - this blog post is an overview of that journey.
So much to do, so little time. We decided we wanted to mock a popular API
but didn't know where to start. Companies like Stripe have an
excellent testmode and even
an open source http server which you
can use instead.
We decided to ask the internet 'Which API have you been struggling to test
against' on various forums like Reddit, HN and others. Ok so now we wait and see
let's see what the internet has to say.
Lo and behold! the internet responded. A bunch of people responded and primarily
complained about payment processors (except for Stripe which was explicitly
praised yet again!). A few products and companies came up repeatedly as being
difficult to test against. We qualitatively evaluated the internet's feedback
and reviewed documentation from the different APIs mentioned to understand
the implementation complexity. After all we had 3.5 days left, so we couldn't
pick anything too complex. In the end we decided to go with the Shopify API!
Just as a disclaimer we have absolutely no issues with Shopify, it just so
happens that a lot of the feedback we got pointed us that direction.
Now the Shopify API is pretty big - and we're building a mock server POC from
scratch, so we decided to narrow down and try to mock a single endpoint
first. We chose
the Event API
which seemed pretty straight forward. Looking at the Event API there are three
dimensions to consider when designing our POC solution.
The Event API returns a JSON payload which is a collection of Events. An example
Event can be seen below:
{// Refers to a certain event and its resources."arguments":"Ipod Nano - 8GB",// A text field containing information about the event."body":null,// The date and time (ISO 8601 format) when the event was created."created_at":"2015-04-20T08:33:57-11:00",// The ID of the event."id":164748010,// A human readable description of the event."desciption":"Received a new order",// A relative URL to the resource the event is for, if applicable."path":"/admin/orders/406514653/transactions/#1145",// A human readable description of the event. Can contain some HTML formatting."message":"Received a new order",// The ID of the resource that generated the event."subject_id":406514653,// The type of the resource that generated the event."subject_type":"Order",// The type of event that occurred. "verb":"confirmed"}
Off the bat it's clear that there is some business logic that needs to be
implemented. For example, there is some notion of causality, i.e. an Order
cannot be closed before it's been placed. This non-trivial business logic was
good news - it means we can showcase some complex data generation logic that's
built into synth.
Since we don't have access to the code that runs the Shopify API, we have to
simulate the behaviour of the Event data model. There are varying degrees of
depth into which one can go, and we broke it into 4 levels:
Level 1 - Stub: Level 1 is just about exposing an endpoint where the data
on a per element basis 'looks' right. You have the correct types, but you
don't really care about correctness across elements. For example, you care
that path has the correct subject_id in the URI, but you don't care that
a given Order goes from placed to closed to re_openedetc...
Level 2 - Mock: Level 2 involves maintaining the semantics of the Events
collection as a whole. For example created_at should always increase
as id increases
(a larger id means an event was generated at a later date).
verbs should follow proper causality (as per the order example above). etc.
Level 3 - Emulate: Level 3 is about maintaining semantics across
endpoints. For example creating an order in a different Shopify API endpoint
should create an order_placed event in the Event API.
Level 4 - Simulate: Here you are basically reverse engineering all the
business logic of the API. It should be indistinguishable from the real
thing.
Really these levels can be seen as increasing in scope as you simulate
semantics per-element, per-endpoint, cross-endpoint and finally for the entire
API.
GET /admin/api/2021-07/events.json which retrieves a list of all events
GET /admin/api/2021-07/events/{event_id}.json which retrieves a single even
by its ID.
The first endpoint exposes various query parameters (which are basically
filters) which alter the response body:
limit: The number of results to show. (default: 50, maximum: 250)since_id: Show only results after the specified ID.created_at_min: Show events created at or after this date and time. (format: 2014-04-25T16:15:47-04:00)created_at_max: Show events created at or before this date and time. (format: 2014-04-25T16:15:47-04:00)filter: Show events specified in this filter.verb: Show events of a certain type.fields: Show only certain fields, specified by a comma-separated list of field names.
Luckily the filtering behaviour is simple, and as long as the implementation
stays true to the description in the docs it should be easy to emulate.
The second endpoint takes one query parameter which is a comma-separated list of
fields to return for a given event. Again should be easy enough.
We decided not to touch authentication for now as the scope would blow up for a
5-day POC. Interestingly we got a bunch of feedback that mocking OAuth flows or
similar would be really useful, regardless of any specific API. We may come
back to this at a future date.
And then there was Day 3. We'd done our due diligence to pick a popular yet
underserved API, and we'd drilled down on how deep we could go in trying to
faithfully represent the implementation.
As any self-respecting engineer would do, we decided to scour the internet for
off-the-shelf solutions to automate as much of the grunt work as possible. Some
naive Googling brought up a mock server called
JSON server - an API
automation solution which spins up a REST API for you given a data definition.
Excited by this we quickly wrote up 2 fake Event API events, and
started JSON server feeding it the fake events - and it worked!
Well almost; we were initially excited by the fact that it did exactly what is
said on the tin and very well, however it didn't have an easy way to specify the
custom query parameters we needed to faithfully reproduce the API. For example
returning results before or after a given created_at timestamp (feel free to
let us know if we missed something here!).
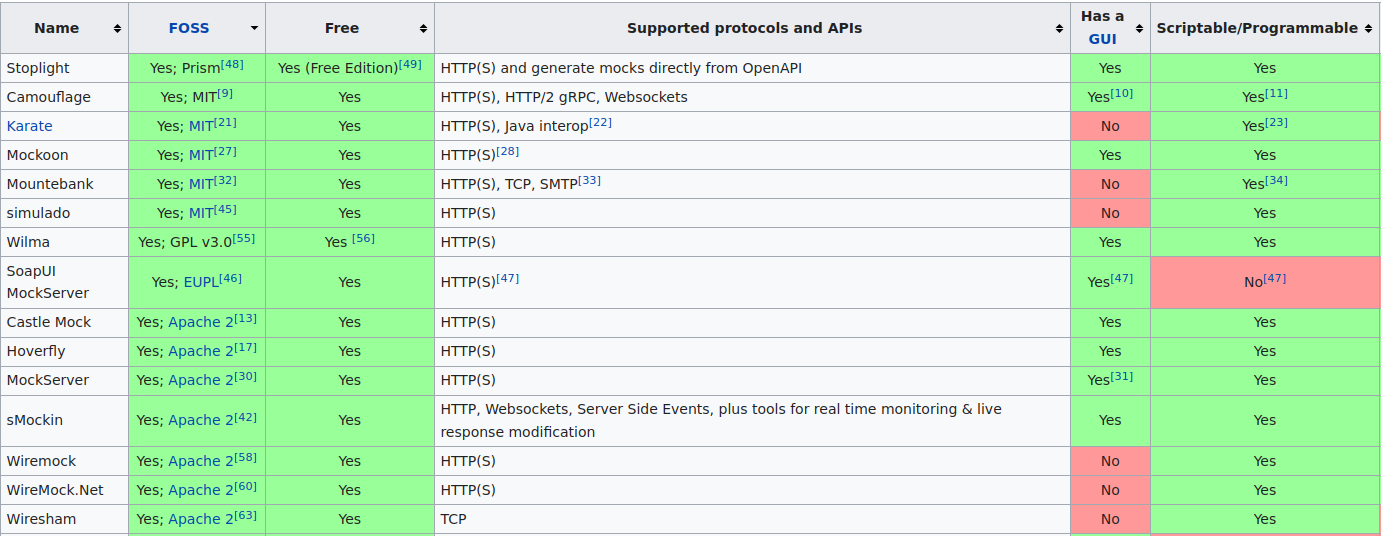
So we needed something a little more sophisticated. The internet came to the
rescue again with a comprehensive
list of API
simulation tools. The basic precondition we had was that the API simulator had
to be OSS with a permissive license we could build on. This immediately
disqualified 50% of the available solutions, and we did a divide and conquer
exercise quickly evaluating the rest.
The remaining tools were either not built for this purpose, or they were
incredibly complex pieces of software that would take a while to get acquainted
with.
In the end we decided to implement the endpoint functionality ourselves - we
figured that a 50 LOC node/express server would do a fine job for a POC.
We decided to reproduce the API at level 1-2 since we didn't really have any
other endpoints. We used synth to quickly
whip up
a data model
that generates data that looks like responses from the Event API. I won't go
into depth on
how this works here as it's been covered
in other posts. In about 15
minutes of tweaking the synth schema, we generated ~10 Mb data that looks
like this:
[{we had"arguments":"generate virtual platforms","body":null,"created_at":"2019-09-17T14:16:47","description":"Received new order","id":477306,"message":"Received new order","path":"/admin/orders/83672/transactions/#6020","subject_id":1352997,"subject_type":"Order","verb":"closed"},{"arguments":"innovate best-of-breed schemas","body":null,"created_at":"2017-05-20T00:04:41","description":"Received new order","id":370051,"message":"Received new order","path":"/admin/orders/82607/transactions/#9154","subject_id":1226112,"subject_type":"Order","verb":"sale_pending"},{"arguments":"incentivize scalable mindshare","body":null,"created_at":"2018-02-21T12:51:36","description":"Received new order","id":599084,"message":"Received new order","path":"/admin/orders/01984/transactions/#3595","subject_id":1050540,"subject_type":"Order","verb":"placed"}]
We then dumped it all in a MongoDB collection with the one-liner:
Creating the API was pretty straightforward. We wrote
a prismamodel
for the responses which basically worked out of the box with the data dumped
into MongoDB by synth. This gave us all the filtering we needed basically for
free.
Then we wrote a quick and dirty express server that maps the REST endpoint's
querystrings into a query for prisma. The whole thing turned out to be ~90 LOC.
You can check the
source here
.
The data is ready, the API is ready, time to package this thing up and give it
to people to actually use. Let's see if our experiment was a success.
While strategising about distributing our API, we were optimising for two
things:
Ease of use - how simple it is for someone to download this thing and get
going
Time - we have 2-3 hours to make sure this thing is packaged and ready to go
in that order.
We needed to pack the data, database and a node runtime to actually run the
server. Our initial idea was to use docker-compose with 2 services, the
database and web-server, and then the network plumbing to get it to work. After
discussing this for a few minutes, we decided that docker-compose may be an
off-ramp for some users as they don't have it installed or are not familiar
with how it works. This went against our first tenet which is 'ease of use'.
So we decided to take the slightly harder and hackier route of packaging the
whole thing in a single Docker container. It seemed like the best trade-off
between goals 1 and 2.
There were 6 steps to getting this thing over the line:
Start with the MongoDB base image. This gives us a Linux environment and a
database.
Download and install NodeJS runtime in the container.
Download and install synth in the container.
Copy the javascript sources over & the synth data model
Write a
small ENTRYPOINTshell script
to start the mongod, server and generate data into the server
Start the server and expose port 3000
And we're done! We've hackily happily packaged our mock API in a platform
agnostic one liner.
An important aspect of this experiment was to see if we could conceive,
research, design and implement a PoC in a week (as a side project, we were
working on synth at the same time). I can safely say this was a
success! We got it done to spec.
An interesting thing to note is that 60% of the time was spent on
ideating, researching and planning - and only 40% of the time on the actual
implementation. However, spending all that time planning before writing code
definitely saved us a bunch of time, and if we didn't plan so much the project would have
overshot or failed.
Now if the PoC itself was a success is a different question. This is where you
come in. If you're using the Event API, build the image and play around with it.
You can get started by quickly cloning
our git repository and then:
cd shopify && docker build -t shopify-mock .&& docker run --rm -p 3000:3000 shopify-mock
We'd like to keep iterating on the Shopify API and improve it. If there is
interest we'll add more endpoints and improve the existing Event data model.
If you'd like to contribute, or are interested mocks for other APIs other than
Shopify, feel free to open an issue on GitHub!
In this tutorial, we'll learn how to design
the Prisma data model for a basic message board and how to seed
databases with the open-source tool synth and generate mock data to
test our code.
Data modeling (in the context of databases and this tutorial) refers to the
practice of formalizing a collection of entities, their properties and relations
between one another. It is an almost mathematical process (borrowing a lot of
language from set theory) but that should not scare you. When it
comes down to it, it is exceedingly simple and quickly becomes more of an art
than a science.
The crux of the problem of data modeling is to summarize and write down what
constitutes useful entities and how they relate to one another in a graph of
connections.
You may wonder what constitutes a useful entity. It is indeed the toughest
question to answer. It is very difficult to tackle it without a good combined
idea of what you are building, the database you are building on top of and what
the most common queries, operations and aggregate statistics are. There
are many resources out there that will guide you through
answering that question. Here we'll start with the beginning: why is it needed?
Often times, getting the data model of your application right is crucial to its
performance. A bad data model for your backend can mean it gets crippled by
seemingly innocuous tasks. On the other hand, a good grasp on data modeling will
make your life as a developer 1000 times easier. A good data model is not a
source of constant pain, letting you develop and expand without slowing you
down. It just is one of those things that pays out compounding returns.
Plus, there are nowadays many open-source tools that make building applications
on top of data models really enjoyable. One of them is Prisma.
Prisma is an ORM, an object relational mapping. It is a powerful
framework that lets you specify your data model using a database agnostic domain
specific language (called the Prisma schema). It
uses pluggable generators to build a nice javascript API and
typescript bindings for your data model. Hook that up to your IDE
and you get amazing code completion that is tailored to your data model, in
addition to a powerful query engine.
Let's walk through a example. We want to get a sense for what it'll take to
design the data model for a simple message board a little like Reddit
or YCombinator's Hacker News. At the very minimum, we want to
have a concept of users: people should be able to register for an account.
Beyond that, we need a concept of posts: some structure, attached to users,
that holds the content they publish.
Using the Prisma schema language, which is very expressive even
if you haven't seen it before, our first go at writing down a User entity
might look something like this:
model User { objectId Bytes @id@map("_id") id Int @unique@default(autoincrement()) createdAt DateTime @default(now()) email String @unique nickname String posts Post[]}
In other words, our User entity has properties id (a database internal
unique identifier), createdAt (a timestamp, defaulting to now if not
specified, that marks the creation time of the user's account), email (the
user-specified email address, given on registration) which is required to be
unique (no two users can share an email address) and nickname (the user
specified display name, given on registration).
In addition, it has a property posts which links a user with its posts through
the Post entity. We may come up with something like this for the Post
entity:
model Post { objectId Bytes @id@map("_id") id Int @unique@default(autoincrement()) postedAt DateTime @default(now()) title String author User @relation(fields:[authorId],references:[id]) authorId Int}
In other words, our Post entity has properties id (a database internal
unique identifier); postedAt (a timestamp, defaulting to now if not specified,
that marks the time at which the user created the post and published it)
; title (the title of the post); author and authorId which specify a
one-to-many relationship between users and posts.
note
You may have noticed that the User and Post models have an attribute which
we haven't mentioned. The objectId property is
an internal unique identifier used by mongoDB
(the database we're choosing to implement our data model on in this tutorial).
Let's look closer at these last two properties author and authorId. There is
a significant difference between them with respect to how they are implemented
in the database. Remember that, at the end of the day, our data model will need
to be realized into a database. Because we're using Prisma, a lot of
these details are abstracted away from us. In this case,
the prisma code-generator will handle author and authorId
slightly differently.
The @relation(...) attribute on the author property is Prisma's
way of declaring that authorId is a foreign key field. Because
the type of the author property is a User entity, Prisma
understands that posts are linked to users via
the foreign keyauthorId which maps to the user's id, the
associated primary key. This is an example of
a one-to-many relation.
How that relation is implemented is left to Prisma and depends on the
database you choose to use. Since we are using mongodb here, this is
implemented by direct object id references.
Because our data model encodes the relation between posts and users, looking up
a user's posts is inexpensive. This is the benefit of designing a good data
model for an application: operations you have designed and planned for at this
stage, are optimized for.
To get us started using this Prisma data model in an actual
application, let's create a new npm project in an empty directory:
$ npm init
When prompted to specify the entry point, use src/index.js. Install some nice
typescript bindings for node with:
$ npminstall --save-dev @types/node typescript
Then you can initialize the typescript compiler with
$ npx tsc --init
This creates a tsconfig.json file which configures the behavior of the
typescript compiler. Create a directory src/ and add the following index.ts:
import{PrismaClient}from'@prisma/client'const prisma =newPrismaClient()constmain=async()=>{const user =await prisma.user.findFirst()if(user ===null){throwError("No user data.")}console.log(`found username: ${user.nickname}`) process.exit(0)}main().catch((e)=>{console.error(e) process.exit(1)})
Then create a prisma/ directory and add a schema.prisma file containing
the Prisma code for the two entities User and Post.
Finally, to our schema.prisma file, we need to add configuration for our local
dev database and the generation of the client:
Finally, to run it all, edit your package.json file (at the root of your
project's directory). Look for the "script" field and modify the "test"
script with:
{ ..."test":"tsc --project ./ && node ." ... }
Now all we need is for an instance of mongoDB to be running while
we're working. We can run that straight from the official docker image:
$ docker run -d --name message-board-example -p 27017:27017 --rm mongo
To run the example do
$ npm run test> message-board-example@1.0.0 test /tmp/message-board-example> tsc --project ./ && node .Error: No user data.
You should see something close to the output of the snippet: our simple code
failed because it is looking for a user that does not exist (yet) in our dev
database. We will fix that in a little bit
. But first, here's a secret.
Actually it's no secret at all. It is one of those things that everybody with
software engineering experience knows. The key to writing good code is learning
from your mistakes!
When coding becomes tedious is when it is hard to learn from errors. Usually
this is caused by a lengthy process to go from writing the code to testing it.
This can happen for many reasons: having to wait for the deployment of a backend
in docker compose, sitting idly by while your code compiles just to fail at
the end because of a typo, the strong integration of a system with components
external to it, and many more.
The process that goes from the early stages of designing something to verifying
its functionalities and rolling it out, that is what is commonly called
the development cycle.
It should indeed be a cycle. Once the code is out there, deployed and running,
it gets reviewed for quality and purpose. More often than not this happens
because users break it and give feedback. The outcome of that gets folded in
planning and designing for the next iteration or release.
The agile philosophy is built on the idea that this cycle
should be as short as possible.
So that brings the question: how do you make the development cycle as quick as
possible? The faster the cycle is, the better your productivity becomes.
One of the keys to shortening a development cycle is making testing easy. When
playing with databases and data models, it is something that is often hacky. In
fact there are very few tools that let you iterate quickly on data models, much
less developer-friendly tools.
The core issue at hand is that between iterations on ideas and features, we will
need to make small and quick changes to our data model. What happens to our
databases and the data in them in that case? Migration is sometimes an option
but is notoriously hard and may not work at all if our changes are significant.
For development purposes the quickest solution is seeding our new data model
with mock data. That way we can test our changes quickly and idiomatically.
At Synth we are building a declarative test data generator. It lets
you write your data model in plain zero-codeJSON and seed many
relational and non-relational databases with mock data. It is
completely free and open-source.
Let's take our data model and seed a
development mongoDB database instance with Synth.
Then we can make our development cycle very short by using
an npm script
that sets it all up for us whenever we need it.
We'll need the synth command-line tool to get started. From a
terminal, run:
$ curl -sSL https://getsynth.com/install |sh
This will run you through an install script for the binary release
of synth. If you prefer installing from source, we got you: head
on over to the Installation
pages of the official documentation.
Once the installer script is done, try running
$ synth versionsynth 0.5.4
to make sure everything works. If it doesn't work, add $HOME/.local/bin
to your $PATH environment variable with
Just like Prisma and its schema DSL, synth lets you
write down your data model with zero code.
There is one main difference: the synth schema is aimed at the
generation of data. This means it lets you specify the semantics of your data
model in addition to its entities and relations. The synth schema
has an understanding of what an email, a username, an address are; whereas the
Prisma schema only cares about top-level types (strings, integers, etc).
Let's navigate to the top of our example project's directory
and create a new directory called synth/ for storing our synth
schema files.
Each file we will put in the synth/ directory that ends in .json will be
opened by synth, parsed and interpreted as part of our data
model. The structure of these files is simple: each one represents
a collection in our database.
A collection is a single JSON schema file, stored in a namespace directory.
Because collections are formed of many elements, their Synth schema
type is that of arrays.
To get started, let's create a User.json file in the synth/ directory:
Let's break this down. Our User.json collection schema is a JSON object with
three fields. The "type" represents the kind of generator we want. As we said
above, collections must generate arrays. The "length" and "content"
fields are the parameters we need to specify an array generator.
The "length" field specifies how many elements the generated array must have.
The "content" specifies from what the elements of the array are generated.
For now the value of "content" is a generator of the null type. Which is why
our array has null as a single element. But we will soon change this.
Note that the value of "length" can be another generator. Of course, because
the length of an array is non-negative number, it cannot be just any generator.
But it can be any kind that will generate non-negative numbers. For example
By default synth fixes the seed of its
internal PRNG. This means that, by default, running synth many times
on the same input schemas will give the same output data. If you want to
randomize the seed - and thus randomize the result, simply add the
flag --random:
Before we can get our users collection to match
our User Prisma model, we need to understand how to
generate more kinds of data with synth.
Everything that goes into a schema file is a schema node. Schema
nodes can be identified by the "type" field which specifies which kind of node
it is. The documentation pages have
a complete taxonomy of schema nodes and their "type".
For the id field we should use the id variant, which is
auto-incrementing. Here is an example of id used in an array so we
can see it behaves as expected:
Its type in the data model is that of a String. The synth schema type for
that is string.
There are many different variants of string and they are
all exhaustively documented. The different variants are
identified by the presence of a distinguishing field which can be
Since we are interested in generating email addresses, we will be using
the "faker" variant which leverages a preset collection of
generators for common properties like usernames, addresses and emails:
OK, so we now know how to generate the id and the email properties of
our User model. But we do not yet know how to put them
together in one object. For that we need the object type:
Now we have everything we need to finish writing down
our User model as a synth schema. A quick lookup of
the documentation pages will tell us how to generate
the createdAt and nickname fields.
Here is the finished result for our User.json collection:
:::caution[`date_time`][synth-datetime] is now a generator on its own and is no longer a subtype of the `string` generator:::### Making sure our constraints are satisfiedLooking back at the [`User` model](#prisma-is-awesome) we started from, there'sone thing that we did not quite address yet. The `email` field in the Prismaschema has the `@unique` attribute:```graphql email String @unique
This means that, in our data model, no two users can share the same email
address. Yet, we haven't added that constraint anywhere in
our final synth schema
for the User.json collection.
What we need to use here is modifiers. A modifier is an
attribute that we can add to any synth schema type to modify the way it
behaves. There are two modifiers currently supported:
The optional modifier is an easy way to make a schema node
randomly generate something or nothing:
{"type":"number","optional":true,"constant":42}
Whereas the unique modifier is an easy way to enforce the
constraint that the values generated have no duplication. So all we need to do,
to represent our data model correctly, is to add the unique
modifier to the email field:
Now that we have set up our User.json collection, let's turn our attention to
the Post model and write out the synth schema for
the Post.json collection.
:::caution[`date_time`][synth-datetime] is now a generator on its own and is no longer a subtype of the `string` generator:::It all looks pretty similar to the `User.json` collection, except for oneimportant difference at the line```json synth "authorId": "@User.content.id"
The syntax @... is synth's way of
specifying relations between collections. Here we are creating
a many-to-1 relation between the field authorId
of the Post.json collection and the field id of the User.json
collection.
Now that our data model is implemented in Synth, we're ready to
seed our test database with mock data. Here we'll use
the offical mongo Docker image, but if you are using a
relational database like Postgres
or MySQL, you can follow the same process.
To start the mongo image in the background (if you haven't done so already), run
That's it! Our test mongo instance is now seeded with the data of around 100
users. Head over to the examples repository to see the complete
working example.
Join us in our mission to make test data easy and painless! We
also have a very active Discord server where many members of the
community would be happy to help if you encounter an issue!
I recently wrote the most complex procedural Rust macro I’ve ever attempted. This post tries to outline the problems I’ve encountered and tells how I overcame them.
With synth, we are building a declarative command line test data generator. For now, the specification that declares what test data to build is just JSON that gets deserialised to our data structures using serde_json. This was a quick and easy way to configure our application without much overhead in terms of code. For example:
However, it’s also not very nice to write (for example JSON has no comments, no formulas, etc.), so we wanted to bind our specification to a scripting language. Our end goal is to extend the language (both in terms of builtin functions and syntax) to make the configuration really elegant. After some testing and benchmarking different runtimes, our choice fell on koto, a nice little scripting language that was built foremost for live coding.
Unfortunately, koto has a very bare interface to bind to external Rust code. Since we are talking about a rather large number of types we want to include, it was clear from the start that we would want to generate the code to bind to koto.
So I started with a somewhat simple macro to wrangle koto types (e.g. Maps) into our Rust types. However, I soon found that the marshalling overhead would have been fine for an initial setup phase, but not for recurrent calls into koto (for example for filter functions called for each row). Thus I changed my approach to try and bind functions, then extended that to types and impl blocks.
I found – as I then thought – a genius technique of generating functions that would call each other, thus daisy-chaining a series of code blocks into one that could then be called with another bindlang_main!() proc macro:
static FN_NUMBER: AtomicUsize = AtomicUsize::new(0);fn next_fn(mut b: Block, arg: &Expr) -> Item { let number = FN_NUMBER.fetch_add(1, SeqCst); let this_fn = fn_ident(number); if let Some(n) = number.checked_sub(1) { let last_fn = fn_ident(n); b.stmts.push(parse_quote! { #last_fn(#arg); }); } b.stmts.extend(last_call); parse_quote! { fn #this_fn(#arg) { #b } }}#[proc_macro]fn bindlang_main(arg: TokenStream) -> TokenStream { let arg = ident(arg.to_string()); TokenStream::from(if let Some(n) = FN_NUMBER.load(SeqCst).checked_sub(1) { let last_fn = fn_ident(n); quote! { #last_fn(#arg) } } else { proc_macro2::TokenStream::default() })}
I also wrote a derive macro to implement the marshalling traits. This worked well for a small example that was entirely contained within one module, but failed once the code was spread out through multiple modules: The functions would no longer be in the same scope and therefore stopped finding each other.
Worse, I needed a number of pre-defined maps with functions for method dispatch for our external types within koto. A type in Rust can have an arbitrary number of impl blocks but I needed exactly one table, and I couldn’t simply daisy-chain those.
It was clear I needed a different solution. After thinking long and hard I came to the conclusion that I needed to pull all the code together in one scope, by the bindlang_main!() macro. My idea was that I create a HashMap of syn::Items to be quoted together into one TokenStream. A lazy static Arc<Mutex<Vec<Context>>> was to collect the information from multiple attribute invocations:
#[derive(Default)]struct Context { bare_fns: Vec<MethodSig>, modules: HashMap<String, Vec<MethodSig>>, vtables: HashMap<String, Vec<MethodSig>>, types: HashMap<String, String>,}lazy_static::lazy_static! { static ref CONTEXT: Arc<Mutex<Context>> = Arc::new(Mutex::new(Context::default()));}#[proc_macro_attribute]pub fn bindlang(_attrs: TokenStream, code: TokenStream) -> TokenStream { let code_cloned = code.clone(); let input = parse_macro_input!(code_cloned as Item); // evaluate input here, and store information in Context // CONTEXT.lock().unwrap()... code}
This was when I found out that none of syn's type is Send and therefore cannot be stored within a Mutex. My first attempt to circumvent this was moving everything to Strings and using syn::parse_str to get the items out. This failed because of macro hygiene: Each identifier in Rust proc_macros has an identity. Two identifiers resulting from two macro operations will get different identities, no matter if their textual representation is the same.
I also found that proc_macro_derives have no way to get the #[derive(..)] attribute of the type, and I wanted to also bind derived trait implementations (at least for Default, because some types have no other constructors). So I removed the derive and moved the implementation to the #[bindlang] attribute macro, which now works on types, impl blocks and fns.
Beware: This makes use of the (unspecified, but as of now working) top-down order of macro expansion to work!
There is a Span::mixed_context() variant that will yield semi-hygienic macros (like with macro_rules). However, this looked risky (macro hygiene is there to protect us, so we better have a good reason to override it), so I took the data oriented approach, collecting the info I needed to create the code in the lazy_static to walk within bindlang_main!(). I still tried to generate the trait impls for marshalling directly in the attribute macro, but this again ran into macro hygiene trouble, because I could not recreate the virtual dispatch table identifiers. After moving this part to the main macro, too, the macro finally expanded successfully.
Except it didn’t compile successfully.
I had forgotten to use the items I was creating code for in the macro, and koto requires all external types to implement Display. So I added those imports as macro arguments and added the Displayimpls to be met with a type inference error within the macro invocation. Clearly I needed some type annotations, but the error message only showed me the macro invocation, which was pretty unhelpful.
My solution to debug those was to cargo expand the code, comment out the macro invocation and copy the expanded portions in its place so that my IDE would pinpoint the error for me. I had to manually un-expand some format! invocations so the code would resolve correctly, and finally found where I needed more type annotations. With those added, the code finally compiled. Whew!
I then extended the bindings to also cover trait impls and Options, while my colleague Christos changed the code to marshall Rust values into koto values to mangle Result::Err(_) into koto’s runtime errors. Remembering that implicit constructors (structs and enum variants) are also useful, I added support to binding those if public. There was another error where intermediate code generated wouldn't parse, but some eprintln! debugging helped pinpoint the piece of code where it happened.
When trying to bind functions taking a non self referenced argument (e.g. fn from(value: &Value) -> Self), I found that the bindings would not work, because my FromValue implementation could not get references. Remember, a function in Rust cannot return a borrow into a value that lives only within it. It took me a while to remember I blogged about the solution in 2015! Closures to the rescue! The basic idea is to have a function that takes a closure with a reference argument and return the result of that closure:
Having this in a separate trait allows us to distinguish types where the borrow isn't &T, e.g. for &str. Also we gain a bit of simplicity by using unified function call syntax (MyType::my_fn(..) instead of v0.my_fn). This also meant I had to nest the argument parsing: I did this by creating the innermost Expr and wrap it in argument extractors in reverse argument order:
Note that match in the else part is there to introduce a binding without requiring a Block, a common macro trick. Now all that was left to do was add #[bindlang] attributes to our Namespace and its contents, and also add a lot of Display implementations because koto requires this for all ExternalValue implementors.
In conclusion, our test configuration should now look something like:
That's only the beginning: I want to introduce a few coercions, a custom koto prelude and perhaps some syntactic sugar to make this even easier to both read and write.
Macros that collect state to use later are possible (well, as long as the expansion order stays as it is) and useful, especially where code is strewn across various blocks (or even files or modules). However, if code relies on other code, it best be emitted in one go, otherwise module visibility and macro hygiene conspire to make life hard for the macro author. And if at one point the expansion order gets changed in a way that breaks the macro, I can change it to a standalone crate to be called from build.rs thanks to proc_macro2 being decoupled from the actual implementation.
I get it. Almost everyone has done it. Your users’ data is sitting there ready to use, just copy-paste that to your dev environment and there you have some good test data for yourself. Job done - easy - you can move on to the next task.
Worse even, when you need to make sure that your dev/staging data is up to date - you spend your day setting up a cron job that routinely syncs production data to your dev or UAT environments.
If you’re getting an uneasy feeling every time you do this - you’re not alone. So why do people still do it? Here’s what I found to be the dominant reasons for this, and my thoughts on why those reasons are bunk.
1. It’s always been done this way so why change now#
This is rarely a valid reason to do anything, yet sometimes we inherit a process that deep down we know is flawed, but perhaps feel like we don't have enough knowledge or authority to challenge.
I've been there. When you are new at a company, telling more senior people they're doing things wrong seems intimidating, but if you have a viable alternative (more on that below) you can suggest (and ideally deliver on), your co-workers will appreciate it.
Having been in the data privacy space for a while now, it is painfully obvious how often someone actually finds out. One of the big improvements that GDPR has brought about is that it put a spotlight on how frequent and widespread data leaks and breaches really are - not a day goes by without new ones being reported. In light of this, hoping that this doesn't affect you is not an ideal strategy.
3. It’s just for myself and a bunch of my co-workers, what’s the worst that can happen#
By taking data to a less secure environment you waste all effort you put into security controls of your production environments. Proper privacy measures go one step beyond and look at what happens if there is a data breach - either due to a mistake, or an attack - by minimising the number of people who work with real (sensitive) data you complement your other data security measures.
Sensitive data should only really be accessed when absolutely necessary - that’s in the spirit of building proper privacy-respecting culture.
4. There is just no f…ing time to do this properly#
It can be really painful to pseudonymise data, especially if your data model is very large and complex. It can take even more time to set up data obfuscation pipelines that keep your test data up to date - as if this wasn’t enough - all these scripts keep breaking as your data model evolves. Basically, in so many cases, the task of obfuscating data while preserving its complexity and referential integrity is just too much hassle. Shameless plug: I have some good news and some better news.
Synth is a declarative data generator that can enable you quickly generate realistic looking test data. Better still, it’s completely free and open source - we built it with developers in mind and really hope it can help address this problem once and for all. Our goal is to make it possible for you to get going with realistic-looking fake data in no time. 1
5. We’re already GDPR compliant, I can do what I want with the users’ data#
Let me preface everything I say by stating that I am not a lawyer, but I have been in this space for a while now and have spoken to numerous consultants, lawyers and experts on this matter. GDPR can be vague on certain things, but in my opinion using production data for testing is clearly a no-go. (See more on this in the notes). If things go wrong it will be very hard to justify to the regulators why sensitive data was copied to and used in its raw form in testing environments.2
Last but not least, trust is 🔑 - the way you treat your users’ data in a way defines your relationship with them. Being responsible about the data that your users trust you with is incredibly important in building a good and healthy culture for your company or project. Trust is hard to build and easily lost. This may seem trivial, but these “small” decisions define the future of your company, not the “culture” page on your website.
Being responsible is a team effort, but it pays off long-term. 3
Synth goes one step beyond pseudonimisation - it creates completely fake data that looks and quacks like the real data. Data generated with Synth can be shared more freely.↩
GDPR Article 25 and 32 refer to the requirements around implementing pseudonymisation.↩
We often get asked what is the right stage of the project/company to start using something like Synth. The best answer is right from the start, the second best is right now. With our declarative “data as code” framework, your test data generation will evolve alongside your data model.↩
Developing high quality software inevitably requires some testing data.
You could be:
Integration testing your application for correctness and regressions
Testing the bounds of your application in your QA process
Testing the performance of queries as the size of your dataset increases
Either way, the software development lifecycle requires testing data as an integral part of developer workflow. In this article, we'll be exploring 3 different methods for generating test data for a Postgres database.
As you can see, we've set very insecure default credentials. This is not meant to be a robust / productionised instance, but it'll do for our testing harness.
This schema captures some business logic of our app. We have unique primary keys, we have foreign key constraints, and we have some domain-specific data types which have 'semantic meaning'. For example, the random string _SX Æ A-ii is not a valid phone number.
The first thing you can do which works well when you're starting your project is to literally manually insert all the data you need. This involves just manually writing a SQL script with a bunch of INSERT statements. The only thing to really think about is the insertion order so that you don't violate foreign key constraints.
So here we're inserting directly into our database. This method is straight forward but does not scale when you need more data or the complexity of your schema increases. Also, testing for edge cases requires your hard-coding edge cases in the inserted data - resulting in a linear amount of work for the bugs you want to catch.
Since you're a programmer, you don't like manual work. You like things to be seamless and most importantly automated!
Postgres comes with a handy function called generate_series which, ...drum roll... generates series! We can use this to generate as much data as we want without writing it by hand.
Let's use generate_series to create 100 companies and 100 contacts
We generated 100 companies and contacts here, the types are correct, but the output is underwhelming. First of all, every company has exactly 1 contact, and more importantly the actual data looks completely useless.
If you care about your data being semantically correct (i.e. text in your phone column actually being a phone number) we need to get more sophisticated.
We could define functions ourselves to generate names / phone numbers / emails etc, but why re-invent the wheel?
Synth is an open-source project designed to solve the problem of creating realistic testing data. It has integration with Postgres, so you won't need to write any SQL.
Synth uses declarative configuration files (just JSON don't worry) to define how data should be generated. To install the synth binary refer to the installation page.
The first step to use Synth is to create a workspace. A workspace is just a directory in your filesystem that tell Synth that this is where you are going to be storing configuration:
$ mkdir workspace &&cd workspace && synth init
Next we want to create a namespace (basically a stand-alone data model) for this schema. We do this by simply creating a subdirectory and Synth will treat it as a separate schema:
$ mkdir my_app
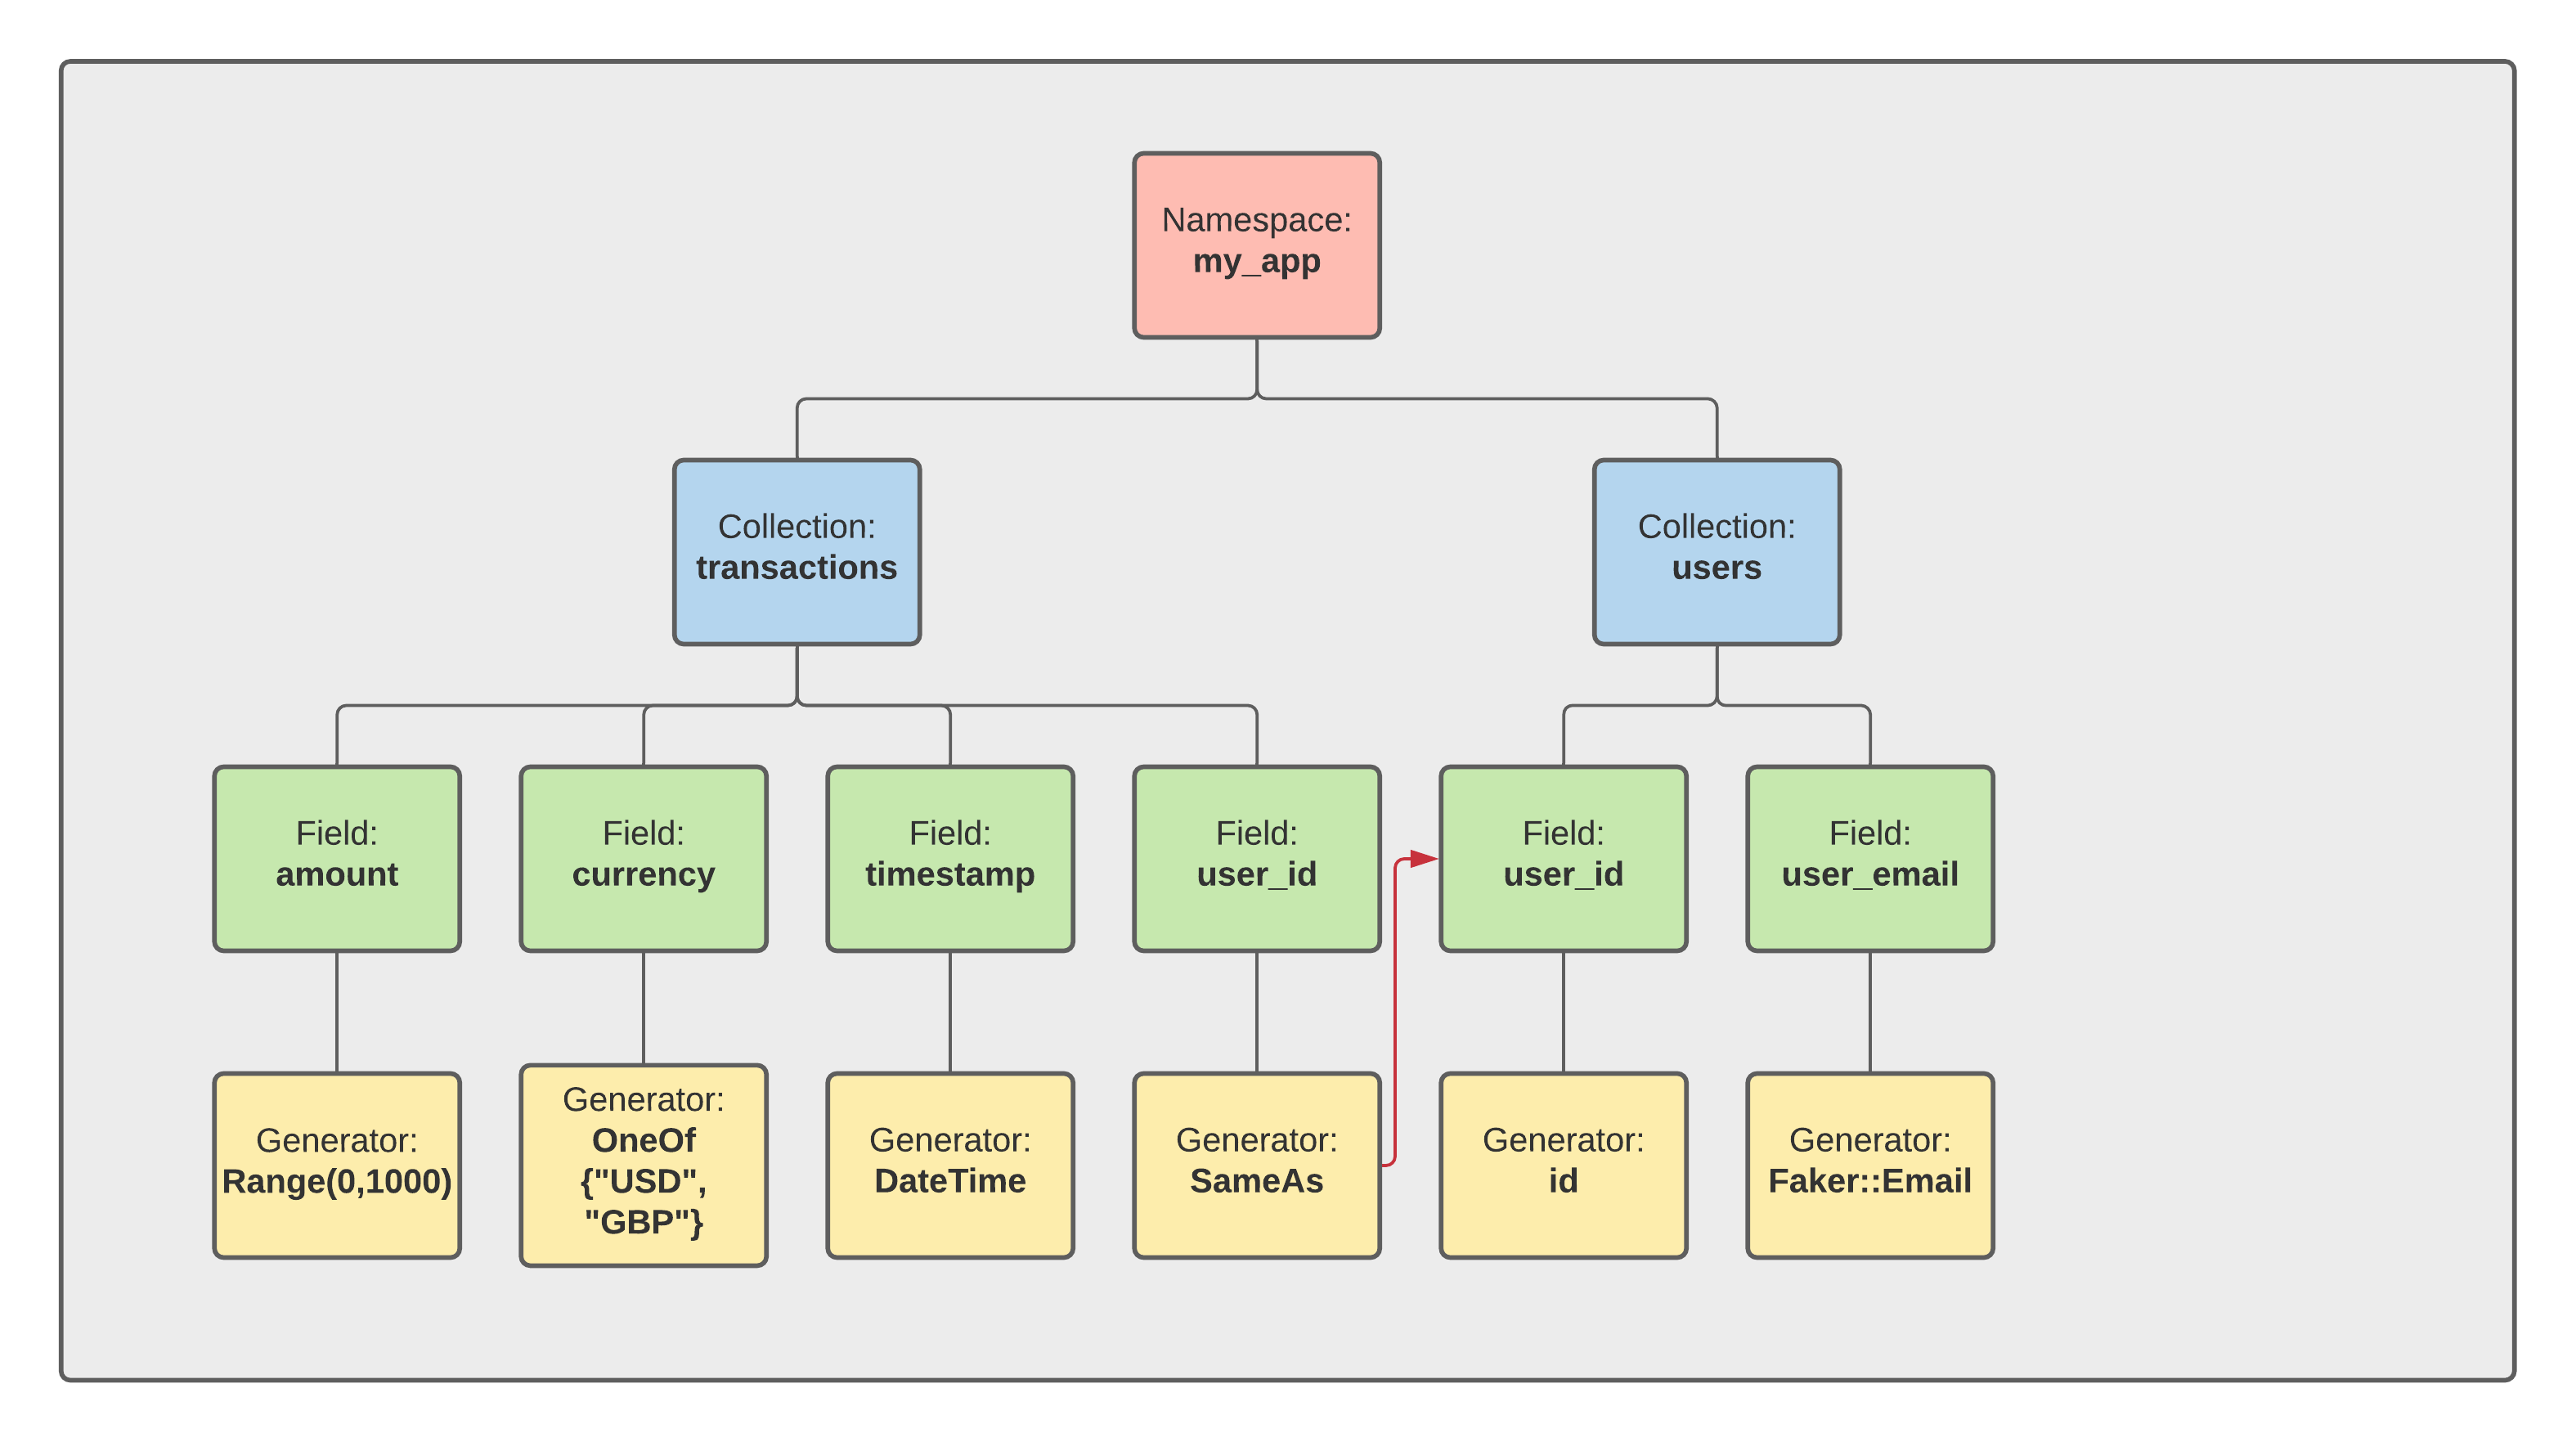
Now comes the fun part! Using Synth's configuration language we can specify how our data is generated. Let's start with the smaller table companies.
To tell Synth that companies is a table (or collection in the Synth lingo) we'll create a new file app/companies.json.
Here we're telling Synth that we have 2 columns, company_id and company_name. The first is a number, the second is a string and the contents of the JSON object define the constraints of the data.
If we sample some data using this data model we get the following:
Now we can do the same thing for the contacts table by create a file my_app/contacts.json. Here we have the added complexity of a foreign key constraints to the company table, but we can solve it easily using Synth's same_as generator.
There is quite a bit going on here - to get an in-depth understanding of the synth configuration refer I'd recommend reading the comprehensive docs. There are tons of cool features which this schema can't really explore!
Now we have both our tables data model under Synth, we can generate data into Postgres:
Manual Insertion: Is ok to get you started. If your needs are basic it's the path of least effort to creating a working dataset.
Postgres generate_series: This method scales better than manual insertion - but if you care about the contents of your data and have foreign key constraints you'll need to write quite a bit of bespoke SQL by hand.
Synth: Synth has a small learning curve, but to create realistic testing data at scale it reduces most of the manual labour.
In the next post we'll explore how to subset your existing database for testing purposes. And don't worry if you have sensitive / personal data - we'll cover that too.
So we've all been in this situation. You're building a Web App, you're super productive in your stack and you can go quickly - however generating lot's of data to see what your app will look like with enough users and traffic is a pain.
Either you're going to spend a lot of time manually inputting data or you're going to write some scripts to generate that data for you. There must be a better way.
In this post we're going to explore how we can solve this problem using the open-source project Synth. Synth is a state-of-the-art declarative data generator - you tell Synth what you want your data to look like and Synth will generate that data for you.
This tutorial is going to use a simple MERN (Mongo Express React Node) web-app as our test subject, but really Synth is not married to any specific stack.
I'm going to assuming you're working on MacOS or Linux (Windows support coming soon 🤞) and you have NodeJS, Yarn and Docker installed.
For this example we'll be running Synth version 0.3.2 .
As a template, we'll use a repository which will give us scaffolding for the MERN app. I picked this example because it shows how to get started quickly with a MERN stack, where the end product is a usable app you can write in 10 minutes. For our purposes, we don't really need to build it from scratch, so let's just clone the repo and avoid writing any code ourselves.
Next, we'll be using docker to run an ephemeral version of our database locally. Docker is great for getting started quickly with popular software, and luckily for us MongoDB has an image on the docker registry. So - let's setup an instance of MongoDB to run locally (no username / password):
docker run -d --name mongo-on-docker -p 27017:27017 mongo
The repository we just cloned contains a working end-to-end web-app running on a MERN stack. It's a super simple CRUD application enabling the user to add / remove some movie reviews which are persisted on a MongoDB database.
The app consists of 2 main components, a nodejs server which lives under the movies-app/server/ sub-directory, and a React front-end which lives under the movies-app/client sub-directory.
The client and server talk to each other using a standard HTTP API under /movie.
So let's get started and run the back-end:
cd server &&yarninstall&& node index.js
And then the client (you'll need two terminals here 🤷):
Hold the phone. Why are we adding movies by hand since we have a tool to generate data for us?
Well, by adding a little bit of test data by hand, we can then use Synth to infer the structure of the data and create as many movies as we want for us. Otherwise we would have to write the entire data definition (what we call a schema) by hand.
So, let's add a couple of movies manually using the Web UI.
Ok, so now that we have a couple of movies, let's get started with Synth!
To install Synth on MacOS / Linux, visit the docs and choose the appropriate installation for your OS. If you are feeling adventurous, you can even build from source!
Synth uses a declarative data model to specify how data is generated.
Hmmm, so what is a declarative model you may ask? A declarative model, as opposed to an imperative model, is where you 'declare' your desired end state and the underlying program will figure out how to get there.
On the other had, an imperative model (which is what we are mostly used to), is step by step instructions on how to get to our end-state. Most popular programming languages like Java or C are imperative - your code is step-by-step instructions on how to reach an end state.
Programming frameworks like SQL or React or Terraform are declarative. You don't specify how to get to your end-state, you just specify what you want and the underlying program will figure out how to get there.
With Synth you specify what your desired dataset should look like, not how to make it. Synth figures how to build it for you 😉
A workspace represents a set of synthetic data namespaces managed by Synth. Workspaces are marked by .synth/ sub-directory.
A workspace can have zero or more namespaces, where the namespaces are just represented as sub-directories. All information pertaining to a workspace is in its directory.
So let's create sub-directory called data/ and initialize our Synth workspace.
The namespace is the top-level abstraction in Synth. Namespaces are the equivalent of Schemas in SQL-land. Fields in a namespace can refer to other fields in a namespace - but you cannot reference data across namespaces.
Namespaces in turn, have collections which are kind of like tables in SQL-land. A visual example of the namespace/collection hierarchy can be seen below.
To create a namespace, we need to feed some data into Synth.
There are two steps to feed data into Synth from our MongoDB instance:
We need to export data from MongoDB into a format that Synth can ingest. Luckily for us, Synth supports JSON out of the box so this can be done quite easily with the mongoexport command - a light weight tool that ships with MongoDB to enable quick dumps of the database via the CLI. We need to specify a little bit more metadata, such as the database we want to export from using --db cinema , the collection using --collection and the specific fields we are interested in --fields name,rating,time. We want the data from mongoexport to be in a JSON array so that Synth can easily parse it, so let's specify the --jsonArray flag.
Next, we need to create a new Synth namespace using the synth import command. synth import supports a --from flag if you want to import from a file, but if this is not specified it will default to reading from stdin. We need to feed the output of the mongoexport command into Synth. To do this we can use the convenient Bash pipe | to redirect the stdout from mongoexport into Synth's stdin.
Synth runs an inference step on the JSON data that it's fed, trying to infer the structure of the data. Next Synth automatically creates the cinema namespace by creating the cinema/ sub-directory and populates it with the collection movies.json.
$ tree -a data/data/├── .synth│ └── config.toml└── cinema └── movies.json
We can now use this namespace to generate some data:
So now we've generated data with the same schema as the original - but the value of the data points doesn't really line up with the semantic meaning of our dataset. For example, the time array is just garbled text, not actual times of the day.
The last steps is to tweak the Synth schema and create some realistic looking data!
There is a lot going on here but let's break it down.
The top-level object (which represents our movies collection) is of type array - where the content of the array is an object with 4 fields, _id, name, time, and rating.
We can completely remove the field _id since this is automatically managed by MongoDB and get started in making our data look real. You may want to have the Generators Reference open here for reference.
First let's change the rating field. Our app can only accept numbers between 0 and 10 inclusive in increments of 0.5. So we'll use the Number::Range content type to represent this and replace the existing value:
The time field has been correctly detected as an array of values. First of all, let's say a movie can be shown up to 5 times a day, so we'll change the high field at time.length.range to 6 (high is exclusive). At this stage, the values are just random strings, so let's instead use the String::DateTime content type to generate hours of the day.
:::caution`date_time` is now a generator on its own and is no longer a subtype of the `string` generator:::### NameFinally, the movie name field should be populated with realistic looking movie names.Under the hood, Synth uses the Python Faker library to generate so called 'semantic types' (think credit card numbers, addresses, license plates etc.). Unfortunately Faker does no have movie names, so instead we can use a random text generator instead with a capped output size.So let's use the `String::Faker` content type to generate some fake movie names!```json synth{ "type": "string", "faker": { "generator": "text", "max_nb_chars": 20 }}
So now that we can generate as much correct data as we want, let's point Synth at MongoDB and let loose the dogs of war.
This step can be broken into two parts:
Run the synth generate command with our desired collection movies and specifying the number of records we want using the --size field.
Pipe stdout to the mongoimport command, mongoexport's long lost cousin. Again here we specify the database we want to import to, --db cinema and the specific collection movies. We also want the --jsonArray flag to notify mongoimport that it should expect a JSON array.
This post was a summary of how you can use Synth to generate realistic looking test data for your Web App. In the next part of this tutorial, we'll explore how we can use Synth to generate relational data, i.e. where you have references between collections in your database.
To check out the Synth source code you can visit the Synth repo on GitHub, and to join the conversation hop-on the the Synth discord server.