
2 posts tagged with "prisma"

View All Tags

ยท 12 min read

So you want to mock an API

API mocking refers to the process of simulating the behaviour of a real API using a fake replacement.

There are many great use-cases for API mocking. You may want to mock an API to eliminate development dependencies between engineering teams. If for example a service which is a dependency to your front-end isn't ready - you may want a placeholder which will unblock your front-end team.

API mocking is also a really powerful tool when doing integration tests against 3rd party APIs. This can be broken down roughly into functional and non-function testing:

  • Functional Testing: You care about the semantics of the API. It is important to be able to make a request and get an appropriate response which takes your request into account. Unfortunately API providers often have sub-par testing environments which can make this a real pain.
  • Non-Functional Testing: You don't really care about the semantics of the API. This can be used to speed up integration tests as requests don't need to travel to the API providers servers. You may also want to verify your SLAs, load test / stress test your systems etc. In this case being rate-limited by the API provider's testmode can be a limiting constraint.

At Synth, we're building a declarative data generator. We wanted to apply our data generation engine to mocking a subset of a popular API and see how far we could go. We set out to prototype a solution over (roughly) 5 days as a side project - this blog post is an overview of that journey.

Day 1: Picking an API#

So much to do, so little time. We decided we wanted to mock a popular API but didn't know where to start. Companies like Stripe have an excellent testmode and even an open source http server which you can use instead.

We decided to ask the internet 'Which API have you been struggling to test against' on various forums like Reddit, HN and others. Ok so now we wait and see let's see what the internet has to say.

Day 2: Choosing Shopify#

Lo and behold! the internet responded. A bunch of people responded and primarily complained about payment processors (except for Stripe which was explicitly praised yet again!). A few products and companies came up repeatedly as being difficult to test against. We qualitatively evaluated the internet's feedback and reviewed documentation from the different APIs mentioned to understand the implementation complexity. After all we had 3.5 days left, so we couldn't pick anything too complex. In the end we decided to go with the Shopify API!

Just as a disclaimer we have absolutely no issues with Shopify, it just so happens that a lot of the feedback we got pointed us that direction.

Now the Shopify API is pretty big - and we're building a mock server POC from scratch, so we decided to narrow down and try to mock a single endpoint first. We chose the Event API which seemed pretty straight forward. Looking at the Event API there are three dimensions to consider when designing our POC solution.

1. The Data Model#

The Event API returns a JSON payload which is a collection of Events. An example Event can be seen below:

{    // Refers to a certain event and its resources.    "arguments": "Ipod Nano - 8GB",    // A text field containing information about the event.    "body": null,    // The date and time (ISO 8601 format) when the event was created.    "created_at": "2015-04-20T08:33:57-11:00",    // The ID of the event.    "id": 164748010,    // A human readable description of the event.    "desciption": "Received a new order",    // A relative URL to the resource the event is for, if applicable.    "path": "/admin/orders/406514653/transactions/#1145",    // A human readable description of the event. Can contain some HTML formatting.    "message": "Received a new order",    // The ID of the resource that generated the event.    "subject_id": 406514653,    // The type of the resource that generated the event.    "subject_type": "Order",    // The type of event that occurred.     "verb": "confirmed"}

Off the bat it's clear that there is some business logic that needs to be implemented. For example, there is some notion of causality, i.e. an Order cannot be closed before it's been placed. This non-trivial business logic was good news - it means we can showcase some complex data generation logic that's built into synth.

Since we don't have access to the code that runs the Shopify API, we have to simulate the behaviour of the Event data model. There are varying degrees of depth into which one can go, and we broke it into 4 levels:

  1. Level 1 - Stub: Level 1 is just about exposing an endpoint where the data on a per element basis 'looks' right. You have the correct types, but you don't really care about correctness across elements. For example, you care that path has the correct subject_id in the URI, but you don't care that a given Order goes from placed to closed to re_openedetc...
  2. Level 2 - Mock: Level 2 involves maintaining the semantics of the Events collection as a whole. For example created_at should always increase as id increases (a larger id means an event was generated at a later date). verbs should follow proper causality (as per the order example above). etc.
  3. Level 3 - Emulate: Level 3 is about maintaining semantics across endpoints. For example creating an order in a different Shopify API endpoint should create an order_placed event in the Event API.
  4. Level 4 - Simulate: Here you are basically reverse engineering all the business logic of the API. It should be indistinguishable from the real thing.

Really these levels can be seen as increasing in scope as you simulate semantics per-element, per-endpoint, cross-endpoint and finally for the entire API.

2. The Endpoint Behaviour#

The Event API exposes 2 endpoints:

  • GET /admin/api/2021-07/events.json which retrieves a list of all events
  • GET /admin/api/2021-07/events/{event_id}.json which retrieves a single even by its ID.

The first endpoint exposes various query parameters (which are basically filters) which alter the response body:

limit:          The number of results to show. (default: 50, maximum: 250)since_id:       Show only results after the specified ID.created_at_min: Show events created at or after this date and time. (format: 2014-04-25T16:15:47-04:00)created_at_max: Show events created at or before this date and time. (format: 2014-04-25T16:15:47-04:00)filter:         Show events specified in this filter.verb:           Show events of a certain type.fields:         Show only certain fields, specified by a comma-separated list of field names.

Luckily the filtering behaviour is simple, and as long as the implementation stays true to the description in the docs it should be easy to emulate.

The second endpoint takes one query parameter which is a comma-separated list of fields to return for a given event. Again should be easy enough.

3. Authentication#

We decided not to touch authentication for now as the scope would blow up for a 5-day POC. Interestingly we got a bunch of feedback that mocking OAuth flows or similar would be really useful, regardless of any specific API. We may come back to this at a future date.

Day 3: Evaluating Implementation Alternatives#

And then there was Day 3. We'd done our due diligence to pick a popular yet underserved API, and we'd drilled down on how deep we could go in trying to faithfully represent the implementation.

As any self-respecting engineer would do, we decided to scour the internet for off-the-shelf solutions to automate as much of the grunt work as possible. Some naive Googling brought up a mock server called JSON server - an API automation solution which spins up a REST API for you given a data definition. Excited by this we quickly wrote up 2 fake Event API events, and started JSON server feeding it the fake events - and it worked!

Well almost; we were initially excited by the fact that it did exactly what is said on the tin and very well, however it didn't have an easy way to specify the custom query parameters we needed to faithfully reproduce the API. For example returning results before or after a given created_at timestamp (feel free to let us know if we missed something here!).

So we needed something a little more sophisticated. The internet came to the rescue again with a comprehensive list of API simulation tools. The basic precondition we had was that the API simulator had to be OSS with a permissive license we could build on. This immediately disqualified 50% of the available solutions, and we did a divide and conquer exercise quickly evaluating the rest.

Api Simulation Tools

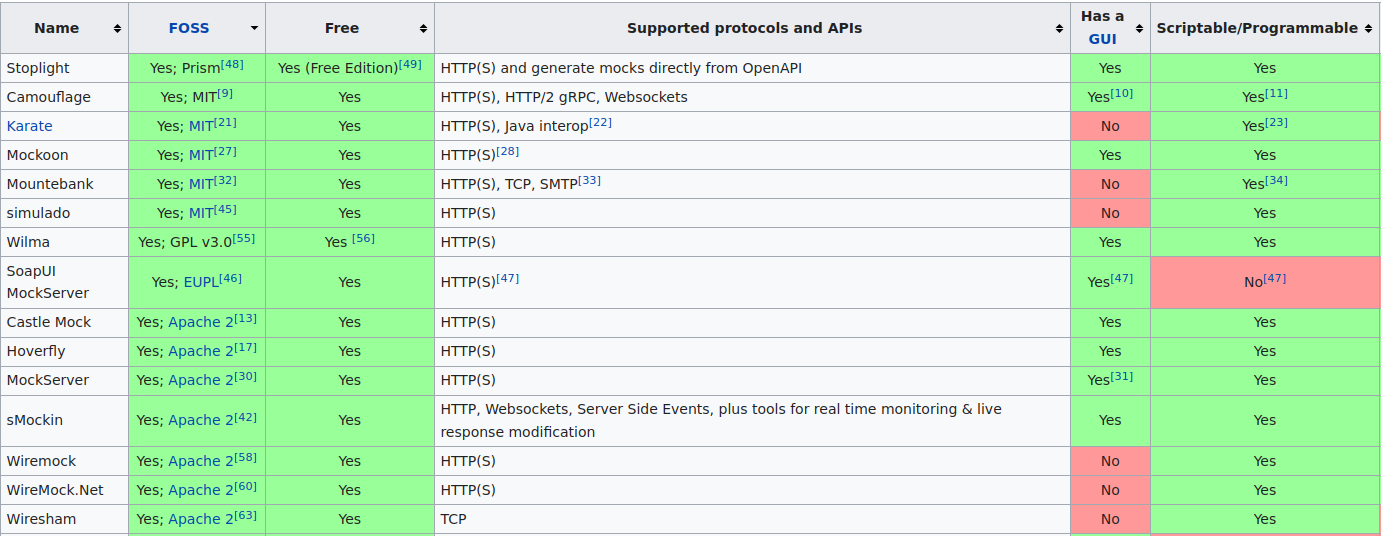
The remaining tools were either not built for this purpose, or they were incredibly complex pieces of software that would take a while to get acquainted with.

In the end we decided to implement the endpoint functionality ourselves - we figured that a 50 LOC node/express server would do a fine job for a POC.

Day 4: Implementing the core functionality#

Day 4 was the most straight forward. Let's get this thing to work!

1. The Data Model#

We decided to reproduce the API at level 1-2 since we didn't really have any other endpoints. We used synth to quickly whip up a data model that generates data that looks like responses from the Event API. I won't go into depth on how this works here as it's been covered in other posts. In about 15 minutes of tweaking the synth schema, we generated ~10 Mb data that looks like this:

[    {we had        "arguments": "generate virtual platforms",        "body": null,        "created_at": "2019-09-17T14:16:47",        "description": "Received new order",        "id": 477306,        "message": "Received new order",        "path": "/admin/orders/83672/transactions/#6020",        "subject_id": 1352997,        "subject_type": "Order",        "verb": "closed"    },    {        "arguments": "innovate best-of-breed schemas",        "body": null,        "created_at": "2017-05-20T00:04:41",        "description": "Received new order",        "id": 370051,        "message": "Received new order",        "path": "/admin/orders/82607/transactions/#9154",        "subject_id": 1226112,        "subject_type": "Order",        "verb": "sale_pending"    },    {        "arguments": "incentivize scalable mindshare",        "body": null,        "created_at": "2018-02-21T12:51:36",        "description": "Received new order",        "id": 599084,        "message": "Received new order",        "path": "/admin/orders/01984/transactions/#3595",        "subject_id": 1050540,        "subject_type": "Order",        "verb": "placed"    }]

We then dumped it all in a MongoDB collection with the one-liner:

$ synth generate shopify --to mongodb://localhost:27017/shopify --size 40000

Next step is to re-create the Event API endpoint.

2. Creating the API#

Creating the API was pretty straightforward. We wrote a prisma model for the responses which basically worked out of the box with the data dumped into MongoDB by synth. This gave us all the filtering we needed basically for free.

Then we wrote a quick and dirty express server that maps the REST endpoint's querystrings into a query for prisma. The whole thing turned out to be ~90 LOC. You can check the source here .

Day 5: Packaging#

Docker

The data is ready, the API is ready, time to package this thing up and give it to people to actually use. Let's see if our experiment was a success.

While strategising about distributing our API, we were optimising for two things:

  1. Ease of use - how simple it is for someone to download this thing and get going
  2. Time - we have 2-3 hours to make sure this thing is packaged and ready to go

in that order.

We needed to pack the data, database and a node runtime to actually run the server. Our initial idea was to use docker-compose with 2 services, the database and web-server, and then the network plumbing to get it to work. After discussing this for a few minutes, we decided that docker-compose may be an off-ramp for some users as they don't have it installed or are not familiar with how it works. This went against our first tenet which is 'ease of use'.

So we decided to take the slightly harder and hackier route of packaging the whole thing in a single Docker container. It seemed like the best trade-off between goals 1 and 2.

There were 6 steps to getting this thing over the line:

  1. Start with the MongoDB base image. This gives us a Linux environment and a database.
  2. Download and install NodeJS runtime in the container.
  3. Download and install synth in the container.
  4. Copy the javascript sources over & the synth data model
  5. Write a small ENTRYPOINT shell script to start the mongod, server and generate data into the server
  6. Start the server and expose port 3000

And we're done! We've hackily happily packaged our mock API in a platform agnostic one liner.

Was it a success?#

An important aspect of this experiment was to see if we could conceive, research, design and implement a PoC in a week (as a side project, we were working on synth at the same time). I can safely say this was a success! We got it done to spec.

An interesting thing to note is that 60% of the time was spent on ideating, researching and planning - and only 40% of the time on the actual implementation. However, spending all that time planning before writing code definitely saved us a bunch of time, and if we didn't plan so much the project would have overshot or failed.

Now if the PoC itself was a success is a different question. This is where you come in. If you're using the Event API, build the image and play around with it.

You can get started by quickly cloning our git repository and then:

cd shopify && docker build -t shopify-mock . && docker run --rm -p 3000:3000 shopify-mock

then simply:

curl "localhost:3000/admin/api/2021-07/events.json"

We'd like to keep iterating on the Shopify API and improve it. If there is interest we'll add more endpoints and improve the existing Event data model.

If you'd like to contribute, or are interested mocks for other APIs other than Shopify, feel free to open an issue on GitHub!

ยท 19 min read

Seeding test databases in 2021 - best practices

In this tutorial, we'll learn how to design the Prisma data model for a basic message board and how to seed databases with the open-source tool synth and generate mock data to test our code.

The code for the example we are working with here can be accessed in the examples repository on GitHub.

Data modeling is not boring#

What is a data model?#

Data modeling (in the context of databases and this tutorial) refers to the practice of formalizing a collection of entities, their properties and relations between one another. It is an almost mathematical process (borrowing a lot of language from set theory) but that should not scare you. When it comes down to it, it is exceedingly simple and quickly becomes more of an art than a science.

The crux of the problem of data modeling is to summarize and write down what constitutes useful entities and how they relate to one another in a graph of connections.

You may wonder what constitutes a useful entity. It is indeed the toughest question to answer. It is very difficult to tackle it without a good combined idea of what you are building, the database you are building on top of and what the most common queries, operations and aggregate statistics are. There are many resources out there that will guide you through answering that question. Here we'll start with the beginning: why is it needed?

Why do I need a data model?#

Often times, getting the data model of your application right is crucial to its performance. A bad data model for your backend can mean it gets crippled by seemingly innocuous tasks. On the other hand, a good grasp on data modeling will make your life as a developer 1000 times easier. A good data model is not a source of constant pain, letting you develop and expand without slowing you down. It just is one of those things that pays out compounding returns.

Plus, there are nowadays many open-source tools that make building applications on top of data models really enjoyable. One of them is Prisma.

Prisma is awesome#

Prisma is an ORM, an object relational mapping. It is a powerful framework that lets you specify your data model using a database agnostic domain specific language (called the Prisma schema). It uses pluggable generators to build a nice javascript API and typescript bindings for your data model. Hook that up to your IDE and you get amazing code completion that is tailored to your data model, in addition to a powerful query engine.

Let's walk through a example. We want to get a sense for what it'll take to design the data model for a simple message board a little like Reddit or YCombinator's Hacker News. At the very minimum, we want to have a concept of users: people should be able to register for an account. Beyond that, we need a concept of posts: some structure, attached to users, that holds the content they publish.

Using the Prisma schema language, which is very expressive even if you haven't seen it before, our first go at writing down a User entity might look something like this:

model User {  objectId  Bytes    @id @map("_id")  id        Int      @unique @default(autoincrement())  createdAt DateTime @default(now())  email     String   @unique  nickname  String  posts     Post[]}

In other words, our User entity has properties id (a database internal unique identifier), createdAt (a timestamp, defaulting to now if not specified, that marks the creation time of the user's account), email (the user-specified email address, given on registration) which is required to be unique (no two users can share an email address) and nickname (the user specified display name, given on registration).

In addition, it has a property posts which links a user with its posts through the Post entity. We may come up with something like this for the Post entity:

model Post {  objectId  Bytes    @id @map("_id")  id        Int      @unique @default(autoincrement())  postedAt  DateTime @default(now())  title     String  author    User     @relation(fields: [authorId], references: [id])  authorId  Int}

In other words, our Post entity has properties id (a database internal unique identifier); postedAt (a timestamp, defaulting to now if not specified, that marks the time at which the user created the post and published it) ; title (the title of the post); author and authorId which specify a one-to-many relationship between users and posts.

note

You may have noticed that the User and Post models have an attribute which we haven't mentioned. The objectId property is an internal unique identifier used by mongoDB (the database we're choosing to implement our data model on in this tutorial).

Let's look closer at these last two properties author and authorId. There is a significant difference between them with respect to how they are implemented in the database. Remember that, at the end of the day, our data model will need to be realized into a database. Because we're using Prisma, a lot of these details are abstracted away from us. In this case, the prisma code-generator will handle author and authorId slightly differently.

The @relation(...) attribute on the author property is Prisma's way of declaring that authorId is a foreign key field. Because the type of the author property is a User entity, Prisma understands that posts are linked to users via the foreign key authorId which maps to the user's id, the associated primary key. This is an example of a one-to-many relation.

How that relation is implemented is left to Prisma and depends on the database you choose to use. Since we are using mongodb here, this is implemented by direct object id references.

Because our data model encodes the relation between posts and users, looking up a user's posts is inexpensive. This is the benefit of designing a good data model for an application: operations you have designed and planned for at this stage, are optimized for.

To get us started using this Prisma data model in an actual application, let's create a new npm project in an empty directory:

$ npm init

When prompted to specify the entry point, use src/index.js. Install some nice typescript bindings for node with:

$ npm install --save-dev @types/node typescript

Then you can initialize the typescript compiler with

$ npx tsc --init

This creates a tsconfig.json file which configures the behavior of the typescript compiler. Create a directory src/ and add the following index.ts:

import {PrismaClient} from '@prisma/client'
const prisma = new PrismaClient()
const main = async () => {    const user = await prisma.user.findFirst()    if (user === null) {        throw Error("No user data.")    }    console.log(`found username: ${user.nickname}`)    process.exit(0)}
main().catch((e) => {    console.error(e)    process.exit(1)})

Then create a prisma/ directory and add a schema.prisma file containing the Prisma code for the two entities User and Post.

Finally, to our schema.prisma file, we need to add configuration for our local dev database and the generation of the client:

datasource db {  provider = "mongodb"  url      = "mongodb://localhost:27017/board"}
generator client {  provider = "prisma-client-js"  previewFeatures = ["mongodb"]}

Head over to the repository to see an example of the complete file, including the extra configuration.

To build the Prisma client, run

$ npx prisma generate

Finally, to run it all, edit your package.json file (at the root of your project's directory). Look for the "script" field and modify the "test" script with:

{  ...  "test": "tsc --project ./ && node ."  ... }

Now all we need is for an instance of mongoDB to be running while we're working. We can run that straight from the official docker image:

$ docker run -d --name message-board-example -p 27017:27017 --rm mongo

To run the example do

$ npm run test
> message-board-example@1.0.0 test /tmp/message-board-example> tsc --project ./ && node .
Error: No user data.

You should see something close to the output of the snippet: our simple code failed because it is looking for a user that does not exist (yet) in our dev database. We will fix that in a little bit . But first, here's a secret.

The secret to writing good code#

Actually it's no secret at all. It is one of those things that everybody with software engineering experience knows. The key to writing good code is learning from your mistakes!

When coding becomes tedious is when it is hard to learn from errors. Usually this is caused by a lengthy process to go from writing the code to testing it. This can happen for many reasons: having to wait for the deployment of a backend in docker compose, sitting idly by while your code compiles just to fail at the end because of a typo, the strong integration of a system with components external to it, and many more.

The process that goes from the early stages of designing something to verifying its functionalities and rolling it out, that is what is commonly called the development cycle.

It should indeed be a cycle. Once the code is out there, deployed and running, it gets reviewed for quality and purpose. More often than not this happens because users break it and give feedback. The outcome of that gets folded in planning and designing for the next iteration or release. The agile philosophy is built on the idea that this cycle should be as short as possible.

So that brings the question: how do you make the development cycle as quick as possible? The faster the cycle is, the better your productivity becomes.

Testing, testing and more testing#

One of the keys to shortening a development cycle is making testing easy. When playing with databases and data models, it is something that is often hacky. In fact there are very few tools that let you iterate quickly on data models, much less developer-friendly tools.

The core issue at hand is that between iterations on ideas and features, we will need to make small and quick changes to our data model. What happens to our databases and the data in them in that case? Migration is sometimes an option but is notoriously hard and may not work at all if our changes are significant.

For development purposes the quickest solution is seeding our new data model with mock data. That way we can test our changes quickly and idiomatically.

Generate data for your data model#

At Synth we are building a declarative test data generator. It lets you write your data model in plain zero-code JSON and seed many relational and non-relational databases with mock data. It is completely free and open-source.

Let's take our data model and seed a development mongoDB database instance with Synth. Then we can make our development cycle very short by using an npm script that sets it all up for us whenever we need it.

Installing synth#

We'll need the synth command-line tool to get started. From a terminal, run:

$ curl -sSL https://getsynth.com/install | sh

This will run you through an install script for the binary release of synth. If you prefer installing from source, we got you: head on over to the Installation pages of the official documentation.

Once the installer script is done, try running

$ synth versionsynth 0.5.4

to make sure everything works. If it doesn't work, add $HOME/.local/bin to your $PATH environment variable with

$ export PATH=$HOME/.local/bin:$PATH

and try again.

Synth schema#

Just like Prisma and its schema DSL, synth lets you write down your data model with zero code.

There is one main difference: the synth schema is aimed at the generation of data. This means it lets you specify the semantics of your data model in addition to its entities and relations. The synth schema has an understanding of what an email, a username, an address are; whereas the Prisma schema only cares about top-level types (strings, integers, etc).

Let's navigate to the top of our example project's directory and create a new directory called synth/ for storing our synth schema files.

โ”œโ”€โ”€ package.jsonโ”œโ”€โ”€ package-lock.jsonโ”œโ”€โ”€ tsconfig.jsonโ”œโ”€โ”€ prisma/โ”œโ”€โ”€ synth/โ””โ”€โ”€ src/

Each file we will put in the synth/ directory that ends in .json will be opened by synth, parsed and interpreted as part of our data model. The structure of these files is simple: each one represents a collection in our database.

Collections#

A collection is a single JSON schema file, stored in a namespace directory. Because collections are formed of many elements, their Synth schema type is that of arrays.

To get started, let's create a User.json file in the synth/ directory:

{  "type": "array",  "length": 1,  "content": {    "type": "null"  }}

Then run

$ synth generate synth/{"users":[null]}

Let's break this down. Our User.json collection schema is a JSON object with three fields. The "type" represents the kind of generator we want. As we said above, collections must generate arrays. The "length" and "content" fields are the parameters we need to specify an array generator. The "length" field specifies how many elements the generated array must have. The "content" specifies from what the elements of the array are generated.

For now the value of "content" is a generator of the null type. Which is why our array has null as a single element. But we will soon change this.

Note that the value of "length" can be another generator. Of course, because the length of an array is non-negative number, it cannot be just any generator. But it can be any kind that will generate non-negative numbers. For example

{  "type": "array",  "length": {    "type": "number",    "range": {      "low": 5,      "high": 10,      "step": 1    }  },  "content": {    "type": "null"  }}

This now makes our users collection variable length. Its length will be decided by the result of generating a new random integer between 5 and 10.

If you now run

$ synth generate synth/{"users":[null,null,null,null,null]}

you can see the result of that change.

info

By default synth fixes the seed of its internal PRNG. This means that, by default, running synth many times on the same input schemas will give the same output data. If you want to randomize the seed - and thus randomize the result, simply add the flag --random:

$ synth generate synth/ --random{"users":[null,null,null,null,null,null,null]}
$ synth generate synth/ --random{"users":[null,null,null,null,null,null,null,null,null]}

Schema nodes#

Before we can get our users collection to match our User Prisma model, we need to understand how to generate more kinds of data with synth.

Everything that goes into a schema file is a schema node. Schema nodes can be identified by the "type" field which specifies which kind of node it is. The documentation pages have a complete taxonomy of schema nodes and their "type".

Generating ids#

Let's look back at our User model. It has four properties:

  • id
  • createdAt
  • email
  • nickname

Let's start with id. How can we generate that?

The type of the id property in the User model is Int:

  id        Int      @unique @default(autoincrement())

and the attribute indicates that the field is meant to increment sequentially, going through values 0, 1, 2 etc.

The synth schema type for numbers is number. Within number there are three varieties of generators:

What decides the variant is the presence of the "range", "constant"or "id" field in the node's specification.

For example, a range variant would look like

{    "type": "number",    "range": {        "low": 5,        "high": 10,        "step": 1    }}

whereas a constant variant would look like

{    "type": "number",    "constant": 42}

For the id field we should use the id variant, which is auto-incrementing. Here is an example of id used in an array so we can see it behaves as expected:

{    "type": "array",    "length": 10,    "content": {        "type": "number",        "id": {}    }}

Generating emails#

Let us now look at the email field of our User model:

  email     String   @unique

Its type in the data model is that of a String. The synth schema type for that is string.

There are many different variants of string and they are all exhaustively documented. The different variants are identified by the presence of a distinguishing field which can be

Since we are interested in generating email addresses, we will be using the "faker" variant which leverages a preset collection of generators for common properties like usernames, addresses and emails:

{    "type": "string",    "faker": {        "generator": "safe_email"    }}

Generating objects#

OK, so we now know how to generate the id and the email properties of our User model. But we do not yet know how to put them together in one object. For that we need the object type:

{    "type": "object",    "id": {        "type": "number",        "id": {}    },    "email": {        "type": "string",        "faker": {            "generator": "safe_email"        }    }}

Leverage the docs#

Now we have everything we need to finish writing down our User model as a synth schema. A quick lookup of the documentation pages will tell us how to generate the createdAt and nickname fields.

Here is the finished result for our User.json collection:

``json synth[expect = "unknown variant date_time`"] { "type": "array", "length": 3, "content": { "type": "object", "id": { "type": "number", "id": {} }, "createdAt": { "type": "string", "date_time": { "format": "%Y-%m-%d %H:%M:%S", "begin": "2020-01-01 12:00:00" } }, "email": { "type": "string", "faker": { "generator": "safe_email" } }, "nickname": { "type": "string", "faker": { "generator": "username" } } } }


:::caution
[`date_time`][synth-datetime] is now a generator on its own and is no longer a subtype of the `string` generator
:::
### Making sure our constraints are satisfied
Looking back at the [`User` model](#prisma-is-awesome) we started from, there'sone thing that we did not quite address yet. The `email` field in the Prismaschema has the `@unique` attribute:
```graphql  email     String   @unique

This means that, in our data model, no two users can share the same email address. Yet, we haven't added that constraint anywhere in our final synth schema for the User.json collection.

What we need to use here is modifiers. A modifier is an attribute that we can add to any synth schema type to modify the way it behaves. There are two modifiers currently supported:

The optional modifier is an easy way to make a schema node randomly generate something or nothing:

{    "type": "number",    "optional": true,    "constant": 42}

Whereas the unique modifier is an easy way to enforce the constraint that the values generated have no duplication. So all we need to do, to represent our data model correctly, is to add the unique modifier to the email field:

{    "type": "string",    "unique": true,    "faker": {        "generator": "safe_email"    }}

The completed end result for the User.json collection can be viewed on GitHub here.

How to deal with relations#

Now that we have set up our User.json collection, let's turn our attention to the Post model and write out the synth schema for the Post.json collection.

Here is the end result:

``json synth[expect = "unknown variant date_time`"] { "type": "array", "length": 5, "content": { "type": "object", "id": { "type": "number", "id": {} }, "postedAt": { "type": "string", "date_time": { "format": "%Y-%m-%d %H:%M:%S", "begin": "2020-01-01 12:00:00" } }, "title": { "type": "string", "faker": { "generator": "bs" } }, "authorId": "@User.content.id" } }


:::caution
[`date_time`][synth-datetime] is now a generator on its own and is no longer a subtype of the `string` generator
:::
It all looks pretty similar to the `User.json` collection, except for oneimportant difference at the line
```json synth    "authorId": "@User.content.id"

The syntax @... is synth's way of specifying relations between collections. Here we are creating a many-to-1 relation between the field authorId of the Post.json collection and the field id of the User.json collection.

The final Post.json collection schema can be viewed on GitHub here.

Synth generate#

Now that our data model is implemented in Synth, we're ready to seed our test database with mock data. Here we'll use the offical mongo Docker image, but if you are using a relational database like Postgres or MySQL, you can follow the same process.

To start the mongo image in the background (if you haven't done so already), run

$ docker run -d -it -p 27017:27017 --rm mongo

Then, to seed the database with synth just run

$ synth generate synth/ --size 1000 --to mongodb://localhost:27017/board

That's it! Our test mongo instance is now seeded with the data of around 100 users. Head over to the examples repository to see the complete working example.

What's next#

Synth is completely free and built in the open by an amazing and fast growing community of contributors.

Join us in our mission to make test data easy and painless! We also have a very active Discord server where many members of the community would be happy to help if you encounter an issue!